
If your home has a patio, balcony, or garden, you’re already one step ahead when it comes to enjoying the fresh spring air without leaving your property.
As the weather warms up and flowers begin to bloom, there’s no better time to refresh your outdoor space.
But rather than just relaxing outdoors, why not make it even more beautiful with a creative spring craft project that’s fun, affordable, and eco-friendly?
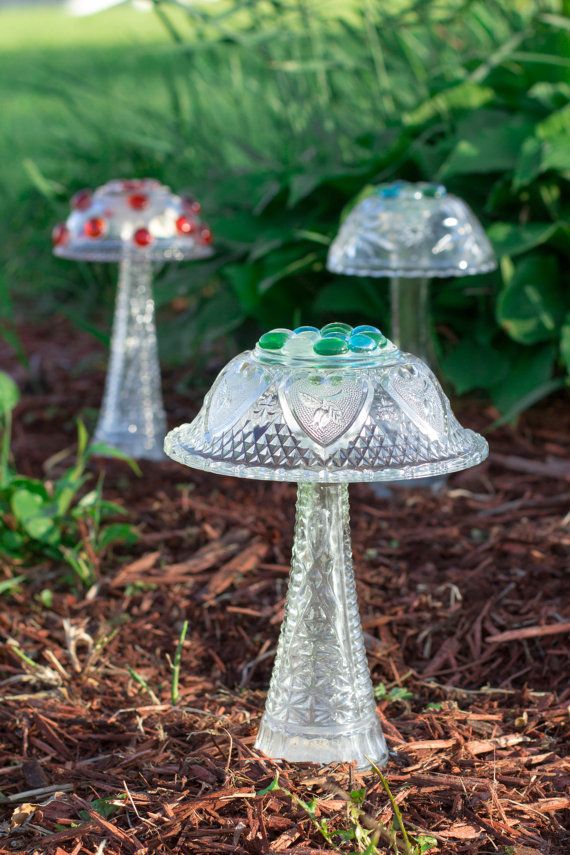
One of the simplest and most whimsical ways to decorate your garden is by making glass mushroom garden ornaments from old household items.
All you need are pieces of unwanted glassware—such as bowls, vases, plates, or drinking glasses—and a bit of super glue or strong outdoor adhesive.
With a few easy steps, you can turn what might have ended up in the recycling bin into charming mushroom sculptures that add personality and magic to your outdoor space.
Spring Cleaning Meets Garden Decorating
Spring is traditionally a time for decluttering, deep cleaning, and giving your home a fresh start.
As you go through cabinets, attics, or storage rooms, you’re likely to come across glass items you no longer need—perhaps a chipped wine glass, an old dessert bowl, or a lonely saucer that’s missing its teacup.
Before tossing them out, consider repurposing them into something beautiful. With just a few different-sized pieces of glass and some adhesive, you can build colorful, reflective mushroom-shaped decorations that look like they belong in a fairy tale.
This is not only a budget-friendly craft project, but it’s also a great way to reduce waste and repurpose materials in a sustainable, artistic way.
What You’ll Need
To make your own DIY glass garden mushrooms, gather the following supplies:
-
Old glass bowls, cups, vases, or dishes (clear, tinted, or colored)
-
Glass adhesive or strong waterproof super glue (E6000 or similar)
-
Optional: decorative gems, glass marbles, or spray paint
-
A clean workspace or table
-
Mild soap and warm water (for cleaning the glassware)
You don’t need to spend a dime on new materials—everything you need is likely already in your home.
How to Make Glass Garden Mushrooms
1. Clean Your Glassware
Before assembling your mushrooms, wash all pieces with warm, soapy water to remove dust, grease, or residue. Dry them thoroughly, as moisture can weaken the adhesive bond.
2. Choose Your Base and Cap
To mimic the shape of a mushroom, use an upside-down glass bowl, plate, or saucer for the mushroom cap and a vase, stemmed glass, or candle holder as the stem. The stem should be sturdy and flat on the bottom so it stands upright on the ground or patio.
3. Apply the Adhesive
Carefully apply your glass glue to the rim of the stem piece. Then press it gently but firmly against the center of the glass cap. Follow the adhesive manufacturer’s instructions for drying and curing time. It’s best to leave it undisturbed for at least 24 hours for a solid hold.
4. Get Creative with Color and Texture
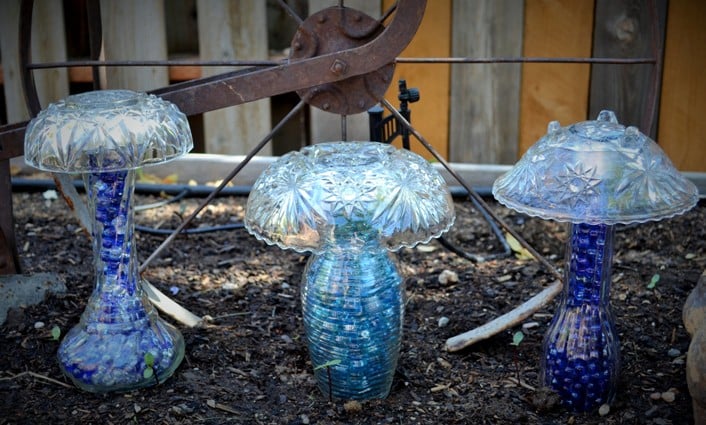
If you want a more colorful mushroom, try mixing clear and colored glass pieces. You can also spray-paint the underside of the mushroom cap for a glowing effect when the sun hits it. Adding glass gems or mosaic tiles around the edges is another great way to enhance visual interest.
5. Place Them in the Garden
Once the glue has fully cured, your mushroom is ready to shine. Place your finished pieces in flower beds, along garden paths, under trees, or grouped near a seating area. Their reflective surfaces catch the sunlight beautifully and add a whimsical charm to any green space.
A Family-Friendly DIY Project
What makes this DIY garden decor especially wonderful is how easy and fun it is for kids to join in. Children love hands-on projects, and this one allows them to express creativity, experiment with colors and shapes, and feel proud of their contribution to the garden.
Older kids can help with washing and assembling the glass pieces (with adult supervision), while younger ones can assist with design choices or embellishments like adding stickers, stones, or paint.
It’s a perfect way to spend quality time together while creating lasting decorations that will brighten your yard for years to come.
Customizing Your Garden Mushrooms
One of the best things about this craft is that no two mushrooms will look alike.
You can create elegant, vintage-style mushrooms using etched glass or crystal, or go for a funky, colorful look with vibrant bowls and tinted glass.
Here are a few fun ideas to personalize your mushrooms:
-
Garden Fairy Theme: Pair the mushrooms with small fairy figurines, toadstools, and moss for a magical fairy garden.
-
Glow-in-the-Dark Accents: Add glow-in-the-dark paint to the underside of the caps so they light up at night.
-
Mini Mushroom Village: Create a series of different-sized mushrooms in varying colors to form a fairy-tale cluster.
-
Seasonal Decorations: Add seasonal touches like faux leaves in autumn or miniature lights in winter.
Let your imagination guide the design. There are no rules—just inspiration and fun!


Making glass mushroom garden decor is one of the most delightful and rewarding spring projects you can do at home. It’s affordable, beginner-friendly, and full of potential for personalization.
By turning leftover glassware into charming decorations, you not only beautify your garden but also give new life to forgotten household items.
Whether you’re looking to refresh your outdoor space, entertain the kids with a creative project, or simply enjoy a peaceful afternoon making art in your backyard, this DIY idea ticks all the boxes.
So the next time you finish spring cleaning, don’t throw out those old glass bowls and vases—turn them into something magical and let your garden sparkle with charm and creativity.


