The traditional home vegetable garden is an intensive, high-maintenance endeavor. Between the annual sprint of starting seeds indoors, tilling compacted earth, endless weeding, and replacing delicate annuals every spring, growers often expend more calories maintaining their plots than they ever harvest from them.
For busy homeowners, digital content creators balancing multiple projects, or those simply seeking food security without the physical toll, this high-input model is unsustainable.
The alternative is perennial permaculture.
By shifting your backyard growing strategy from high-maintenance annuals (like tomatoes, cucumbers, and corn) to resilient perennial food crops, you can build a self-sustaining, self-regenerating ecosystem.
These long-lived plants establish permanent underground networks, survive freezing winter temperatures, and emerge every single spring with renewed vigor and higher yields.
The Ecological Engine: Why Perennials Require Minimal Care
To design a successful, low-input edible garden, you must understand how perennial plants interact with the soil matrix.
Unlike annuals, which burn through their entire resource reserve and die in a single season, perennials invest their early energy into building a massive architecture beneath the surface.
-
Subsoil Nutrient Mining: Deep-rooting perennials push their roots far below the standard vegetable garden baseline, drawing up vital trace minerals, micronutrients, and water into their leaves. When these leaves drop and decompose in autumn, they naturally fertilize the topsoil, cycling nutrients back into the root zone without chemical inputs.
-
Permanent Soil Architecture: Because perennial beds are never tilled, the delicate soil layers remain intact. This allows beneficial underground fungal networks (mycorrhizae) to flourish. These microscopic fungi attach to the plant roots, acting as an extended transport system that swaps deep-zone water and phosphorus for plant sugars, dramatically boosting the garden’s disease resistance.
-
Self-Regulating Weed Suppression: Once established, a mature perennial bed develops a dense, interlocking canopy and root system. This biological shield starves weed seeds of light and space, effectively automating your weeding chores.
Perennial Garden Environmental Matrix
To build an ideal foundation for a permanent food garden, your site selection and soil structure should target these optimal baselines:
| Cultivation Metric | Ideal Target Range | Physiological Impact |
| Soil Texture Standard | Loamy, Gritty, or High-Organic Compost | Ensures rapid drainage while retaining deep-zone capillary moisture |
| Target Soil pH Profile | 6.2 to 6.8 (Slightly Acidic) | Maximizes bioavailability of essential minerals like phosphorus and iron |
| Solar Exposure | 6 to 8 Hours of Unfiltered Sunlight | Fuels maximum carbohydrate production for fruiting and root storage |
| Organic Matter Content | 8% to 12% by volume | Sustains the long-term soil food web without synthetic fertilizers |
The 3-Tier Perennial Garden Blueprint
A successful “set and forget” garden utilizes vertical layering. By stacking plants of varying heights, you mimic the architecture of a natural forest edge.
This layout optimizes solar absorption, maximizes food output per square foot, and creates a self-shading mulch layer that keeps the soil cool and damp.
Layer 1: The Canopy & Shrub Layer (The Core Infrastructure)
This layer forms the permanent back wall or central anchor of your garden plot. It catches the most sunlight, breaks strong winds, and provides a habitat for beneficial predatory insects.
-
The Top Choices: Highbush blueberries, thornless blackberries, honeyberries, and dwarf fruit trees (such as figs or plums).
Layer 2: The Herbaceous Ground Layer (The Main Yield)
These mid-sized plants do not form woody stems above ground. Instead, they die back completely to the soil level in winter but return larger, stronger, and more productive every spring.
-
The Top Choices: Asparagus, Jerusalem artichokes, rhubarb, sea kale, and globe artichokes.
Layer 3: The Living Mulch Layer (The Weed Shield)
Instead of spreading plastic weed barriers or purchasing bags of wood mulch every year, fill the lowest level with edible groundcovers that knit together to blanket the soil.
-
The Top Choices: Alpine strawberries, creeping thyme, trailing rosemary, and oregano.
The 7 Ultimate Perennial Food Crops to Plant Once
To build a garden that genuinely takes care of itself, choose rugged crops suited to your climate zone that require minimal pruning and possess natural resistance to common garden pests.
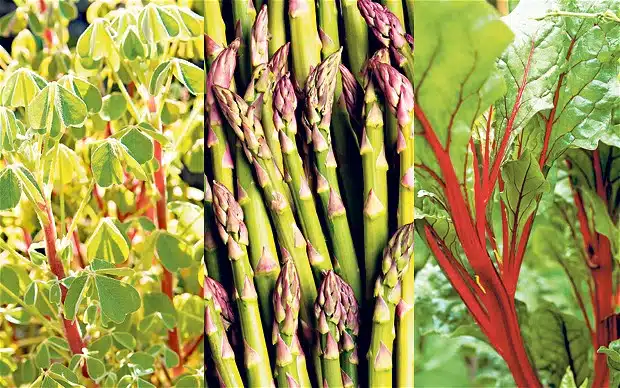
1. Asparagus (Asparagus officinalis)
Asparagus is the ultimate perennial vegetable. A single bed planted from bare-root crowns will produce tender, gourmet spears every spring for 15 to 20+ years.
-
Planting Protocol: Dig a trench 12 inches wide and 8 inches deep in a spot that gets full sun. Space the crowns 12 inches apart, spreading their roots out like spiders. Cover them with 2 inches of soil, and as the spears emerge throughout the first summer, gradually fill in the rest of the trench.
-
The Harvest Trick: Do not harvest any spears during the first two years. Let them grow into tall, feathery ferns to build a strong root system. From year three onward, you can harvest fresh spears for 6 to 8 weeks every spring.
2. Rhubarb (Rheum rhabarbarum)
Rhubarb is a cold-hardy powerhouse that produces thick, tart, red stalks perfect for pies, preserves, and sauces. It features massive leaves that naturally shade out any weeds trying to grow around its base.
-
Planting Protocol: Rhubarb loves rich soil. Dig a wide hole and mix in a generous amount of aged compost or well-rotted manure. Plant rhubarb crowns in early spring, keeping the central bud just an inch below the soil surface.
-
Ongoing Care: Rhubarb needs plenty of space; leave about 3 feet between plants. Simply cut away any flower stalks that appear in summer to keep the plant’s focus on producing delicious, thick leaf stems.
3. Jerusalem Artichoke (Helianthus tuberosus)
Also known as sunchokes, these plants are members of the sunflower family. They grow up to 10 feet tall, producing beautiful yellow flowers in late summer and a massive harvest of crisp, nutty, underground tubers by autumn.
-
Planting Protocol: Plant the tubers 4 inches deep in early spring. They are incredibly tough and will thrive even in poor, sandy, or heavy clay soils where other vegetables struggle.
-
The Zero-Effort Benefit: You do not need to replant sunchokes. When you dig up the tubers to eat in the winter, the tiny root pieces left behind in the soil will automatically grow into a fresh, full crop the following spring.
4. Thornless Blackberries (Rubus fruticosus)
Traditional wild blackberries are a prickly, invasive headache. However, modern thornless cultivars offer sweet, dark berries without the painful thorns or aggressive spreading habits.
-
Planting Protocol: Plant bare-root or potted starts along a fence line or a simple trellis system. They prefer a spot with rich, consistently moist soil and full sun.
-
Ongoing Care: Blackberries bear fruit on two-year-old wood (canes). Once a cane finishes fruiting in late summer, cut it down to the ground. Leave the fresh, green, one-year-old canes alone; they will provide your berry harvest next year.
5. Egyptian Walking Onion (Allium × proliferum)
Instead of producing flowers, these unusual onions grow clusters of small baby bulbs (bulblets) at the very top of their tall green stalks. As the clusters grow heavy, the stalks naturally bend down to the ground, where the baby bulbs take root and grow.
-
Planting Protocol: Plant the initial bulbs 2 inches deep in well-draining soil.
-
The Zero-Effort Benefit: As the stalks “walk” across your garden bed, they establish a permanent, self-propagating patch. You can harvest the spicy green tops like scallions year-round, or dig up the sweet shallot-like shallots at the base whenever you need them.
6. Globe Artichoke (Cynara cardunculus)
Globe artichokes are striking, dramatic plants with silvery-green foliage that makes a beautiful statement in any garden. The edible artichokes we eat are actually the unopened flower buds of this giant thistle relative.
-
Planting Protocol: Choose a prominent, sunny spot with plenty of room, as a single plant can easily spread 4 feet wide. They thrive in loose, deep, well-draining soil rich in organic nutrients.
-
Ongoing Care: In colder climates (Zone 6 and below), cut the plant back to 10 inches before winter and cover the crown with a thick layer of straw or mulch to protect it from freezing temperatures.
7. Alpine Strawberries (Fragaria vesca)
Unlike standard commercial strawberries that send out long runners and need frequent replacing, alpine strawberries grow in neat, compact clumps. They produce sweet, intensely fragrant gourmet berries from spring all the way until the first winter frost.
-
Planting Protocol: Plant them 12 inches apart as an edible border along your garden beds or pathways. They tolerate partial shade better than standard strawberries, making them a perfect choice for planting beneath tall berry bushes.
-
The Zero-Effort Benefit: They act as a living mulch, forming a thick green carpet that keeps your soil moist and free of weeds while providing a daily harvest of fresh berries.
Step-by-Step Installation: Setting Up Your Bed for Long-Term Success
Because a perennial garden is meant to last for decades, your initial soil preparation is the single most important step. Taking the time to build a rich, fertile bed now will save you years of work down the road.
The Master Maintenance Protocol: True “Set and Forget” Care
While this garden design dramatically cuts down your daily chores, it isn’t entirely maintenance-free. To keep your perennial ecosystem healthy and productive over the years, follow this simple seasonal care routine:
1. The Heavy Autumn Mulch (Insulation and Soil Building)
Every autumn, after the first hard frost kills back the top growth of your herbaceous plants, leave the dead leaves right on the ground to act as natural mulch.
Layer 3 to 4 inches of shredded autumn leaves or clean straw over the entire bed. This insulates the root systems against freezing winter temperatures, prevents soil erosion from heavy rain, and feeds the earthworms and soil biology as it breaks down.
2. The Early Spring Compost Top-Dress (Slow-Release Nutrition)
In early spring, before the first new shoots break through the soil, top-dress the base of your perennial plants with a 1-inch layer of fresh organic compost.
This single application provides all the slow-release macro-nutrients and trace minerals your plants need for the entire growing season, eliminating the need for synthetic chemical fertilizers.
3. The Annual Thinning and Division (Controlling Growth)
Crops like Jerusalem artichokes, Egyptian walking onions, and raspberries are vigorous growers.
Once a year during their dormant winter phase, simply use a sharp spade to dig up excess tubers or cut back outer canes along the edges of your beds.
This keeps your plants from crowding one another and gives you plenty of free root starts to expand your garden or share with neighbors.
Troubleshooting Common Perennial Pathologies
Even the toughest perennial plants can occasionally face challenges from weather or pests. Use this quick-reference guide to spot and resolve issues early:
| Visual Symptom | Primary Diagnosis | Corrective Action Protocol |
| Stunted Spring Growth + Pale Leaves | Low soil temperature or poor drainage causing temporary root dormancy | Clear heavy mulch away from the base of the plant for a week to let the sun warm the soil. |
| White, Powdery Coating on Foliage | Powdery Mildew due to stagnant air or crowded planting beds | Thin out weak stems within the plant’s canopy to improve airflow and allow sunlight to penetrate. |
| Holes in Emerging Spring Shoots | Slug or snail damage on tender young growth during wet spring weather | Apply a thin ring of organic iron phosphate bait pellets around the base of vulnerable plants. |
| Declining Harvest Yields after 5+ Years | Overcrowded root crowns depleting localized nutrients | Carefully dig up and divide the root crowns during the dormant winter season, replanting them with fresh compost. |
Building a “set and forget” edible garden is a rewarding investment in your property’s long-term ecology.
By switching your focus from high-maintenance annuals to deeply rooted perennials, you work with nature rather than fighting against it.


