
Adding creative and whimsical decorations to your garden can transform it into a truly magical space. One charming and easy project you can try is making your own funny hedgehog decorations.
These little creatures add a playful, heartwarming touch to flower beds, pathways, or even tucked among your potted plants.
With just a few simple materials and a bit of imagination, you can craft your own adorable garden hedgehogs in no time.
It’s a fun project for both adults and kids and brings a unique, homemade charm to any outdoor space.
Materials You’ll Need:
- Plastic bottles (any size, depending on how big you want your hedgehogs);
- Strong craft glue or a hot glue gun;
- Thick fabric such as burlap, jute, or old grey tights;
- Buttons or beads for the eyes;
- Scissors;
- Small plants, moss, or lawn clippings for the “spines” or body filling.
Step-by-Step Directions:
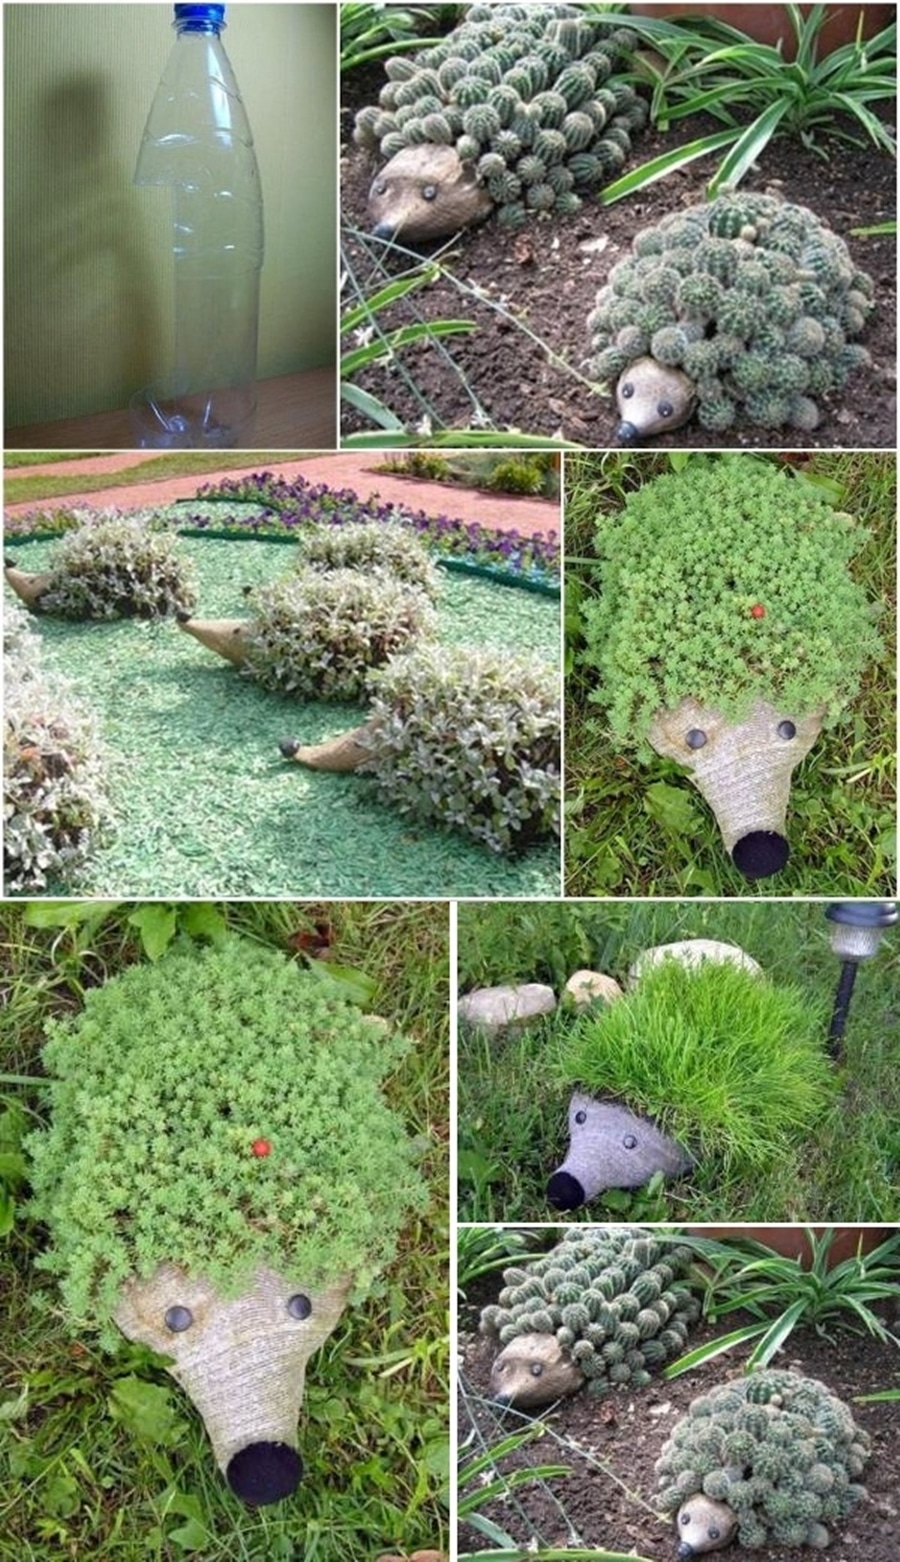
1. Prepare the Plastic Bottle
Start by cutting a plastic bottle in half horizontally. The bottom half will serve as the body of your hedgehog.
Make sure the edges are smooth; you can use scissors or lightly sand them if needed to avoid any sharp spots.
2. Create the Muzzle
Cut a piece of thick fabric, like burlap or old grey tights, to form the hedgehog’s muzzle.
Wrap the open edge of the bottle neatly with the fabric, pulling it tightly around the tip to shape a pointed snout. Secure it in place with strong glue.
If you’re using tights, twist and tie the fabric at the tip to create a neat, defined nose.
3. Attach the Eyes
Glue two small buttons or beads onto the fabric just above the muzzle to create the hedgehog’s eyes.
Choose dark-colored buttons for a more lifelike appearance, or get creative with colorful beads if you want a playful look.
Optional: You can also glue a small bead at the tip of the nose for added detail.
4. Fill the Body
Now for the fun part—creating the hedgehog’s “spines”! Fill the open section of the bottle with small plants, grass clippings, moss, or even trailing succulents.
This not only makes the hedgehog look lush and textured but also integrates it beautifully into your garden’s greenery.
You can plant small low-maintenance succulents, creeping thyme, or even artificial plants if you prefer a no-care option.
5. Finishing Touches
Give your hedgehog a quick inspection. Add extra decorations if you like—perhaps a tiny flower behind its ear or a pebble path leading up to it for even more character.
Once you’re happy with how it looks, place your new hedgehog friend in your garden! They look particularly charming nestled among flowers, by garden borders, or hiding near rocks and shrubs.
Creative Tips to Customize Your Hedgehogs:
- Use different bottle sizes to create a whole family of hedgehogs, from baby to adult.
- Paint the bottle underneath the fabric to add color or patterns.
- Add whiskers using thin wire or string for extra detail.
- Make a festive hedgehog by planting seasonal flowers or decorations inside the bottle for holidays like Easter or Christmas.
Making DIY hedgehog garden decorations is a simple, inexpensive, and incredibly fun project that adds a splash of whimsy to your outdoor space.
With just a few recycled materials and a touch of creativity, you can craft these charming creatures and bring a smile to everyone who visits your garden.
Whether you’re looking for a fun afternoon craft or a unique way to decorate your backyard, these cute hedgehogs are the perfect addition to your garden story.


