
Every autumn, thousands of gardeners throw away their geraniums as soon as the weather turns cold. After months of beautiful red, pink, white, and purple flowers, these plants are often treated as if their growing season – and their life – is over.
But here’s something many gardeners don’t realize: most of the geraniums grown in summer pots, window boxes, and hanging baskets are actually tender perennials, not true annuals.
That means they can survive for several years when protected from freezing temperatures. Even better, one healthy geranium can provide numerous cuttings that grow into brand-new plants without spending money at the garden center.
Instead of buying the same flowers every spring, you can save your favorites, multiply them, and enjoy their colorful blooms year after year.
The secret is acting before the first frost arrives.
Here’s how to save your geraniums before winter, keep them alive indoors, and turn a few healthy stems into a collection of new plants.
Why You Shouldn’t Throw Away Your Geraniums in Fall
The colorful geraniums commonly sold for summer containers are usually Pelargoniums, including zonal, ivy, and scented-leaf varieties.
Unlike hardy geraniums, also called cranesbills, these plants generally cannot survive freezing winter temperatures outdoors.
However, they can continue growing for years in frost-free conditions.
A healthy geranium that looks tired at the end of summer may still have a strong root system and plenty of potential for new growth.
Saving your plants also allows you to preserve favorite varieties that might be difficult to find again next spring.
October note: Don’t wait until your geraniums have blackened leaves or collapsed stems before bringing them indoors. Frost damage can happen quickly, and severely damaged plants may not recover.
1. Bring Your Geraniums Inside Before the First Frost
The first step is protecting your plants from freezing temperatures.
Pelargoniums are sensitive to frost, so monitor your local forecast as autumn progresses. Ideally, begin preparing them when nighttime temperatures regularly fall below approximately 45–50°F (7–10°C), and move them to safety before frost is expected.
If your geraniums are already growing in containers, simply inspect them and move the pots to a suitable indoor location.
For plants growing directly in garden beds, carefully dig around the roots, lift the plants with as much of their root system intact as practical, and transfer them into containers with drainage holes.
Use fresh, well-draining potting mix and water lightly to settle the soil.
A bright, cool sunroom, enclosed porch, or frost-free room can provide suitable winter conditions.
Important note: A warm, dark room isn’t ideal for overwintering geraniums. They need adequate light if they’re going to remain actively growing indoors.
2. Trim Your Geraniums Before Winter Storage
After months of flowering, geraniums often become leggy, with long stems, faded flowers, and aging foliage.
A little autumn pruning can make them easier to manage indoors while improving airflow around the remaining growth.
Start by removing yellow leaves, spent flower stalks, broken stems, and any visibly diseased material.
If your plant has become excessively tall, shorten some of the longest stems just above healthy leaf nodes. New shoots can eventually emerge from these areas.
However, avoid cutting every plant back severely without considering how it will be stored.
Geraniums kept growing in a bright room usually benefit from retaining enough healthy foliage to support photosynthesis. Plants being kept semi-dormant in cool conditions can sometimes tolerate stronger pruning.
October note: Always use clean, sharp pruning shears. Remove diseased material before taking propagation cuttings so you don’t accidentally spread problems to your new plants.
And don’t throw away every healthy stem you remove—some may be perfect for propagation.
3. Turn Healthy Stems Into New Geranium Plants
This is where saving geraniums becomes especially rewarding.
Instead of keeping only one mature plant, you can use healthy stem cuttings to grow several new plants with the same flower color and growth characteristics.
A single large geranium may provide numerous suitable shoots, although the number of new plants depends on its size and health.
How to Take Geranium Cuttings
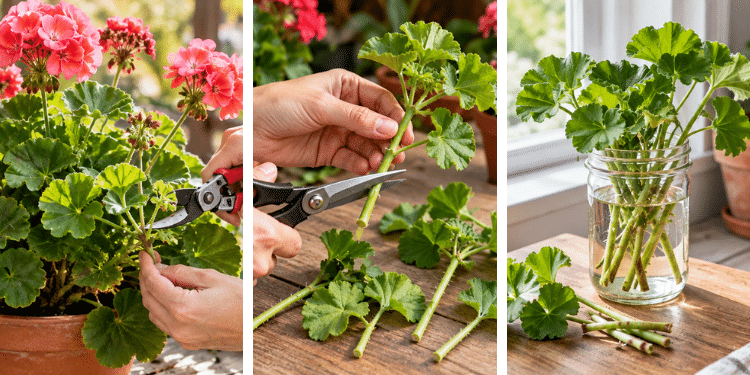
Choose a healthy, nonflowering stem approximately 3–5 inches long. Using clean scissors or pruning shears, make a cut just below a leaf node.
Remove the leaves from the lower portion of the stem, leaving two or three healthy leaves near the top.
If the cutting has flower buds, remove them so it can focus its resources on developing roots.
Allow the cut surface to dry briefly while you prepare your containers, but don’t leave the cutting exposed long enough to wilt.
Fill small pots with a lightly moist, well-draining propagation mix. A combination of seed-starting compost and perlite works well.
Insert the lower part of each cutting into the growing medium and gently firm the mixture around the stem.
Place the pots in bright, indirect light and moderate warmth.
Propagation note: Geranium cuttings are vulnerable to rotting when kept too wet. Keep the rooting mix lightly moist rather than constantly saturated, and provide good airflow.
Under favorable conditions, cuttings may develop roots within approximately 2–4 weeks, although cooler autumn conditions can slow the process.
4. Give Your Cuttings the Right Conditions to Root
Taking cuttings is easy, but the environment you provide afterward determines how successfully they establish.
Geranium cuttings generally root well at temperatures around 65–75°F (18–24°C). A bright windowsill without intense afternoon sunlight can be suitable.
Avoid placing cuttings beside heating vents or cold windows where temperatures fluctuate dramatically.
Check the rooting medium regularly. If the surface begins drying out, add a small amount of water, but avoid leaving the containers standing in water.
Unlike some other cuttings, geraniums don’t necessarily benefit from being sealed inside a very humid plastic bag. Excess moisture around their fleshy stems can encourage decay.
After a few weeks, look for healthy new growth and gently check whether the cutting has developed resistance in the soil.
Once the roots are established, transplant into a slightly larger container if needed.
Rooting note: Not every cutting will survive. If you want ten new plants, start more than ten cuttings to allow for occasional losses.
5. Keep Your Original Geraniums Alive Through Winter
While your cuttings develop roots, don’t forget about the mature plants you brought indoors.
Geraniums usually need less water during winter because shorter days and cooler temperatures slow their growth.
Check the potting mix before watering and allow the upper portion to dry. When watering is needed, moisten the soil and allow excess water to drain away.
Keep the plants in bright conditions and avoid unnecessary fertilizer when growth is slow.
If you have a cool, frost-free location, mature geraniums can sometimes be maintained in a semi-dormant state with minimal watering.
Another traditional option is bare-root storage, where sturdy mature zonal geraniums are lifted and kept in cool, frost-free conditions. However, this method is less predictable and requires regular inspection for drying or rot.
For beginners, keeping plants in pots is generally the easiest approach.
Winter note: A geranium that produces fewer flowers or grows slowly indoors isn’t necessarily unhealthy. Reduced growth is normal when daylight is limited.
6. Check for Pests Before Bringing Plants Indoors
Outdoor geraniums can carry insects that become troublesome once plants are brought inside.
Aphids, whiteflies, spider mites, and mealybugs may hide beneath leaves or around tender growing tips.
Before bringing geraniums near your houseplants, inspect their stems and foliage carefully.
Remove dead leaves, rinse away visible debris, and isolate newly brought-in plants for a short observation period.
If pests are present, identify them and use an appropriate treatment labeled for the plant and pest.
Good airflow and avoiding excessive moisture also help reduce fungal problems.
October note: Never take cuttings from heavily diseased or pest-infested stems. Healthy propagation material gives your new plants a much better start.
Can You Root Geranium Cuttings in Water?
Yes, some geranium cuttings will develop roots in water, but rooting directly in a suitable growing medium is often more reliable.
Water-rooted cuttings may develop delicate roots that need time to adapt after being transferred into soil.
If you prefer water propagation, keep the lower leaves above the waterline and change the water regularly.
Transfer the cutting into potting mix once several healthy roots have formed.
For growing multiple plants efficiently, small pots or propagation trays are usually more practical.
How to Grow Dozens of Geraniums for Free
Imagine starting with three large, healthy geraniums in October.
If each plant provides six suitable cuttings, you’ll have 18 potential new plants. If most root successfully, you could enter spring with a substantial collection without purchasing additional geraniums.
As those plants mature during the following growing season, they may produce additional stems suitable for propagation.
Over time, this allows you to multiply your favorite varieties considerably.
The key is to take cuttings responsibly. Never remove so much healthy growth that you seriously weaken the parent plant.
Money-saving note: Propagation isn’t guaranteed, and not every plant produces enough healthy stems for numerous cuttings. However, starting with several vigorous plants can make it possible to grow dozens of geraniums over successive propagation cycles.
What to Do With Your Geraniums When Spring Arrives
As daylight increases and temperatures warm, your overwintered geraniums should gradually begin producing stronger new growth.
Remove any dead or damaged stems and check whether the plants need fresh potting mix or larger containers.
Increase watering as active growth resumes and begin feeding lightly with a suitable fertilizer according to the product instructions.
Before moving the plants outdoors permanently, gradually acclimate them to outdoor conditions over approximately one to two weeks.
Start with a sheltered, partially shaded location and slowly increase sunlight exposure.
Wait until the danger of frost has passed before leaving tender geraniums outside overnight.
Spring note: Don’t move indoor-grown geraniums directly into strong afternoon sunshine. Their leaves may scorch if they’re not gradually accustomed to outdoor light.
Your beautiful summer geraniums don’t have to end up in the compost pile when October arrives.
With a little preparation, you can save mature plants, protect them from frost, and use their healthy stems to create brand-new geraniums for next year.