Rosemary is one of those herbs that every gardener should have growing somewhere. Its fragrant, needle-like leaves are wonderful for cooking, its delicate flowers attract pollinators, and its evergreen foliage adds beauty to gardens throughout much of the year.
But here’s something many gardeners don’t realize: you don’t need to buy new rosemary plants every time you want another one.
With just a few healthy stems from an established plant, you can grow several new rosemary plants at home, practically for free.
Propagating rosemary from cuttings is surprisingly simple, even if you’ve never tried growing herbs this way before. You don’t need expensive equipment, special gardening skills, or a greenhouse. A small pot, some suitable potting mix, and a little patience are usually enough.
Why Grow Rosemary From Cuttings Instead of Seeds?
Rosemary can be grown from seeds, but germination is often slow and inconsistent. Even when seeds sprout successfully, young seedlings can take quite a while to develop into useful plants.
Cuttings offer a faster and more predictable method.
Instead of waiting for seeds to germinate, you’re starting with a piece of an already established plant. Under suitable conditions, that stem can develop its own roots and eventually grow into an independent rosemary plant.
Another advantage is consistency. Seed-grown rosemary may vary in growth habit, fragrance, and other characteristics, while cuttings preserve the parent plant’s variety.
Garden note: If your rosemary is especially fragrant, compact, or cold-tolerant, taking cuttings is a practical way to keep that variety growing in your garden.
You can also propagate several cuttings at once, increasing your chances of success.
1. Choose the Right Time to Take Rosemary Cuttings
Timing can make a noticeable difference in how quickly rosemary cuttings develop roots.
Late spring through summer is generally one of the easiest periods for propagation because rosemary is actively growing and temperatures are warm.
However, early autumn can also work, particularly in mild climates or when cuttings can be kept in a protected location.
The most important factor is choosing healthy stems that are neither extremely soft nor completely woody.
These are often called semi-ripe or semi-hardwood cuttings. They have begun to mature but still retain enough flexibility to root successfully.
If you’re taking cuttings in October, rooting may take longer because daylight is decreasing and temperatures are cooler.
Propagation note: Rosemary cuttings usually root more reliably in warm, bright conditions without intense direct sunlight. If cold weather is approaching, start them indoors or in a protected greenhouse rather than leaving them exposed to frost.
Avoid taking cuttings from plants that are severely stressed by drought, disease, or root problems.
Healthy parent plants generally produce stronger cuttings.
2. Select Healthy Rosemary Stems
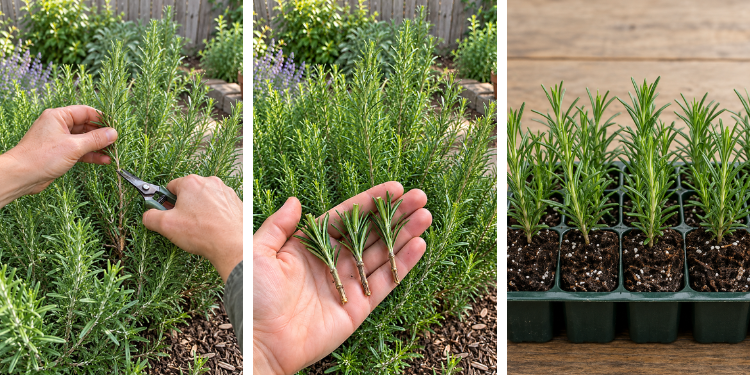
Start by examining your rosemary plant and looking for fresh, healthy shoots.
Choose stems that are approximately 4–6 inches long and have plenty of green foliage. Ideally, the lower portion should feel slightly firm while the upper portion remains flexible.
Avoid stems that are completely brown and woody, as these may root more slowly or less reliably.
It’s also best to choose stems without flowers. Flowering uses resources, and removing flower buds allows the cutting to focus on developing roots.
Use clean, sharp scissors or pruning shears to cut the stem just below a leaf node.
A leaf node is the point where leaves emerge from the stem, and it is a useful location for preparing cuttings.
Cutting note: Take several cuttings rather than relying on just one. Not every cutting will develop roots, even when you follow the correct method.
If you want three new rosemary plants, starting with five or six cuttings gives you a better chance of success.
3. Remove the Lower Leaves
Once you’ve collected your rosemary cuttings, prepare each stem before planting.
Gently remove the leaves from the lower 1–2 inches of the cutting. Leave the foliage on the upper portion intact.
This creates a bare section of stem that can be inserted into the growing medium without burying leaves.
Removing the lower leaves is important because foliage buried in constantly moist soil can begin decomposing, increasing the risk of rot.
You don’t need to strip the entire cutting. The remaining green leaves help support the stem while it develops roots.
Important note: Avoid crushing or tearing the stem while removing leaves. Work gently, especially with young rosemary shoots.
If the cutting has a soft, actively growing tip, you can usually leave it in place unless it is flowering or damaged.
4. Prepare a Light, Well-Draining Rooting Mix
Rosemary cuttings need moisture to develop roots, but they also require oxygen around the base of the stem.
This is why heavy garden soil isn’t the best choice for propagation.
A light rooting medium, such as a mixture of perlite and peat-free seed-starting compost or coco coir, works well. The goal is to create a mixture that retains some moisture without becoming compacted or waterlogged.
Fill a small container with the mixture and moisten it lightly before planting.
Make sure the pot has drainage holes so excess water can escape.
You can place several cuttings around the edge of one pot, provided they have enough space and their leaves aren’t crowded together.
Soil note: Don’t use rich fertilizer-heavy compost or dense clay soil for rosemary cuttings. A clean, airy rooting medium is more important than nutrients during the early rooting stage.
The cutting doesn’t need fertilizer before it has developed a functioning root system.
5. Plant the Cuttings and Keep Them Stable
Use a pencil or small stick to make a planting hole in the moist rooting mixture.
Insert the bare lower portion of the rosemary cutting approximately 1–2 inches into the medium, making sure no leaves are buried.
Gently firm the mixture around the stem so the cutting remains upright.
Repeat the process with your remaining cuttings.
You can dip the lower end into a suitable rooting hormone before planting if you have one available, but this isn’t always necessary. Rosemary can produce roots without it under favorable conditions.
Once all cuttings are planted, water lightly if needed to settle the growing medium.
Planting note: Avoid pushing delicate cuttings directly into compacted soil. Making a small hole first helps prevent damage to the stem.
Place the container somewhere bright but protected from harsh direct sunlight.
6. Maintain Moisture and Humidity While Roots Develop
This is the stage where patience becomes important.
Until rosemary cuttings develop roots, they cannot absorb water as efficiently as established plants. The leaves can still lose moisture, so maintaining a suitable environment helps prevent the stems from drying out.
Keep the rooting medium lightly moist, but never soggy.
A clear plastic bag or transparent propagation cover can help maintain humidity around the cuttings. If you use one, keep the plastic from pressing directly against the leaves and provide occasional ventilation.
Excessive humidity combined with poor airflow can encourage fungal problems, so the goal is gentle humidity rather than a completely sealed, dripping environment.
Humidity note: If condensation constantly covers the inside of the plastic and the leaves remain wet, increase ventilation. Rosemary prefers good airflow and doesn’t benefit from permanently soaked foliage.
Check the pot regularly, especially during warm weather.
If the growing medium begins drying out, add a small amount of water. If it remains wet, allow it more time before watering again.
7. Wait for Roots Before Transplanting
Rosemary cuttings often begin developing roots within approximately 3–8 weeks under favorable conditions, although some may take longer.
The exact timing depends on the variety, temperature, cutting maturity, and growing conditions.
One encouraging sign is the appearance of fresh new growth near the tip of the cutting.
However, new leaves alone don’t guarantee that a strong root system has formed. A cutting can sometimes produce limited growth using stored resources.
After several weeks, gently check whether the cutting offers slight resistance when carefully moved. Avoid repeatedly pulling it from the soil, as this can damage newly forming roots.
Once the cutting has developed a healthy root system, it can be transferred into its own small container.
Use a well-draining potting mix and water gently after transplanting.
Rooting note: Don’t rush to move a cutting into a large pot. Young rosemary plants generally establish more easily in appropriately sized containers that don’t remain excessively wet.
Gradually introduce the rooted plant to stronger sunlight over several days.
Can You Root Rosemary Cuttings in Water?
Yes, rosemary cuttings can sometimes develop roots in water, and many gardeners enjoy this method because they can watch the roots form.
To try it, remove the lower leaves from a healthy cutting and place the bare stem in a small glass of clean water.
Keep the remaining leaves above the waterline and place the glass somewhere bright without intense direct sunlight.
Change the water regularly to keep it fresh.
After several weeks, roots may begin appearing along the submerged stem.
Once several healthy roots have formed, carefully transfer the cutting into a small pot containing moist, well-draining potting mix.
Water propagation note: Rosemary cuttings rooted in water may experience some stress when transferred into soil. Water-grown roots develop under different conditions, so the transition should be gentle.
For gardeners who want stronger root development directly in a growing medium, soil propagation is often the more reliable approach.
Should You Use Rooting Hormone?
Rooting hormone is optional when propagating rosemary.
Some gardeners use it because it may improve rooting success or encourage faster root development, particularly with more mature cuttings.
However, healthy rosemary stems can root naturally without additional products.
If you’re using a commercial rooting hormone, follow the manufacturer’s directions and avoid applying excessive amounts.
For beginners, choosing the right cutting, maintaining appropriate moisture, and providing suitable light are usually more important than purchasing special rooting products.
Where Should You Keep Rosemary Cuttings?
Rosemary cuttings generally do best in bright, indirect light while they establish roots.
A bright windowsill can work, but avoid locations where intense afternoon sunlight overheats the container or causes the cuttings to wilt.
Moderate warmth encourages rooting. Temperatures around 65–75°F (18–24°C) are often suitable.
Keep the container away from cold drafts, heating vents, and sudden temperature fluctuations.
If you’re propagating rosemary during autumn or winter, supplemental grow lights may help when natural daylight is limited.
Location note: Don’t place unrooted cuttings outside during freezing weather. They are much more vulnerable than established rosemary plants.
5 Common Rosemary Propagation Mistakes
1. Using old, woody stems. Extremely mature cuttings may root more slowly than healthy, semi-ripe shoots.
2. Keeping the soil constantly wet. Waterlogged rooting media can cause stems to rot before roots develop.
3. Placing cuttings in intense direct sunlight. Strong sun increases water loss before the cuttings have functioning roots.
4. Transplanting too early. Weak, newly formed roots can be damaged during handling.
5. Expecting every cutting to succeed. Propagation success varies, so starting several cuttings is always a good idea.
Avoiding these mistakes can significantly improve your chances of producing healthy new plants.
How to Care for Your New Rosemary Plants
Once your rosemary cuttings have rooted and started growing, gradually begin treating them like young established plants.
Provide plenty of sunlight, use well-draining soil, and water when the growing medium begins drying out.
Avoid heavy fertilizing while the plants are small. Rosemary generally grows well in relatively lean conditions and doesn’t need excessive nutrients.
If you plan to plant your new rosemary outdoors, wait until conditions are suitable and gradually acclimate the plants to outdoor sunlight and temperatures.
In colder regions, young rosemary plants may benefit from spending their first winter in a bright, protected location.
Young plant note: A newly rooted rosemary cutting is not as cold-hardy as a mature, well-established plant. Give it time to develop a stronger root system before exposing it to harsh winter conditions.
Growing rosemary from cuttings is one of the easiest and most satisfying ways to expand your herb garden without spending money on new plants.
All you need is a healthy rosemary plant, a few suitable stems, a light rooting medium, and a little patience.