Growing carrots sounds simple: scatter some seeds, cover them with soil, and wait. But anyone who has actually grown carrots knows that those tiny seeds can create a surprisingly frustrating job.
They are difficult to space evenly, seedlings often emerge in crowded clumps, and thinning them later can disturb neighboring plants.
Carrot seeds also need consistent moisture while germinating, and their delicate roots don’t appreciate being transplanted once established.
That’s where the egg-tray carrot planting method comes in.
Here’s how to do it.
Why Use Egg Trays for Carrots?
The biggest advantage is spacing.
Carrot seeds are extremely small. When they’re sprinkled directly into a garden row, it’s easy to accidentally drop ten seeds in one spot and none in the next.
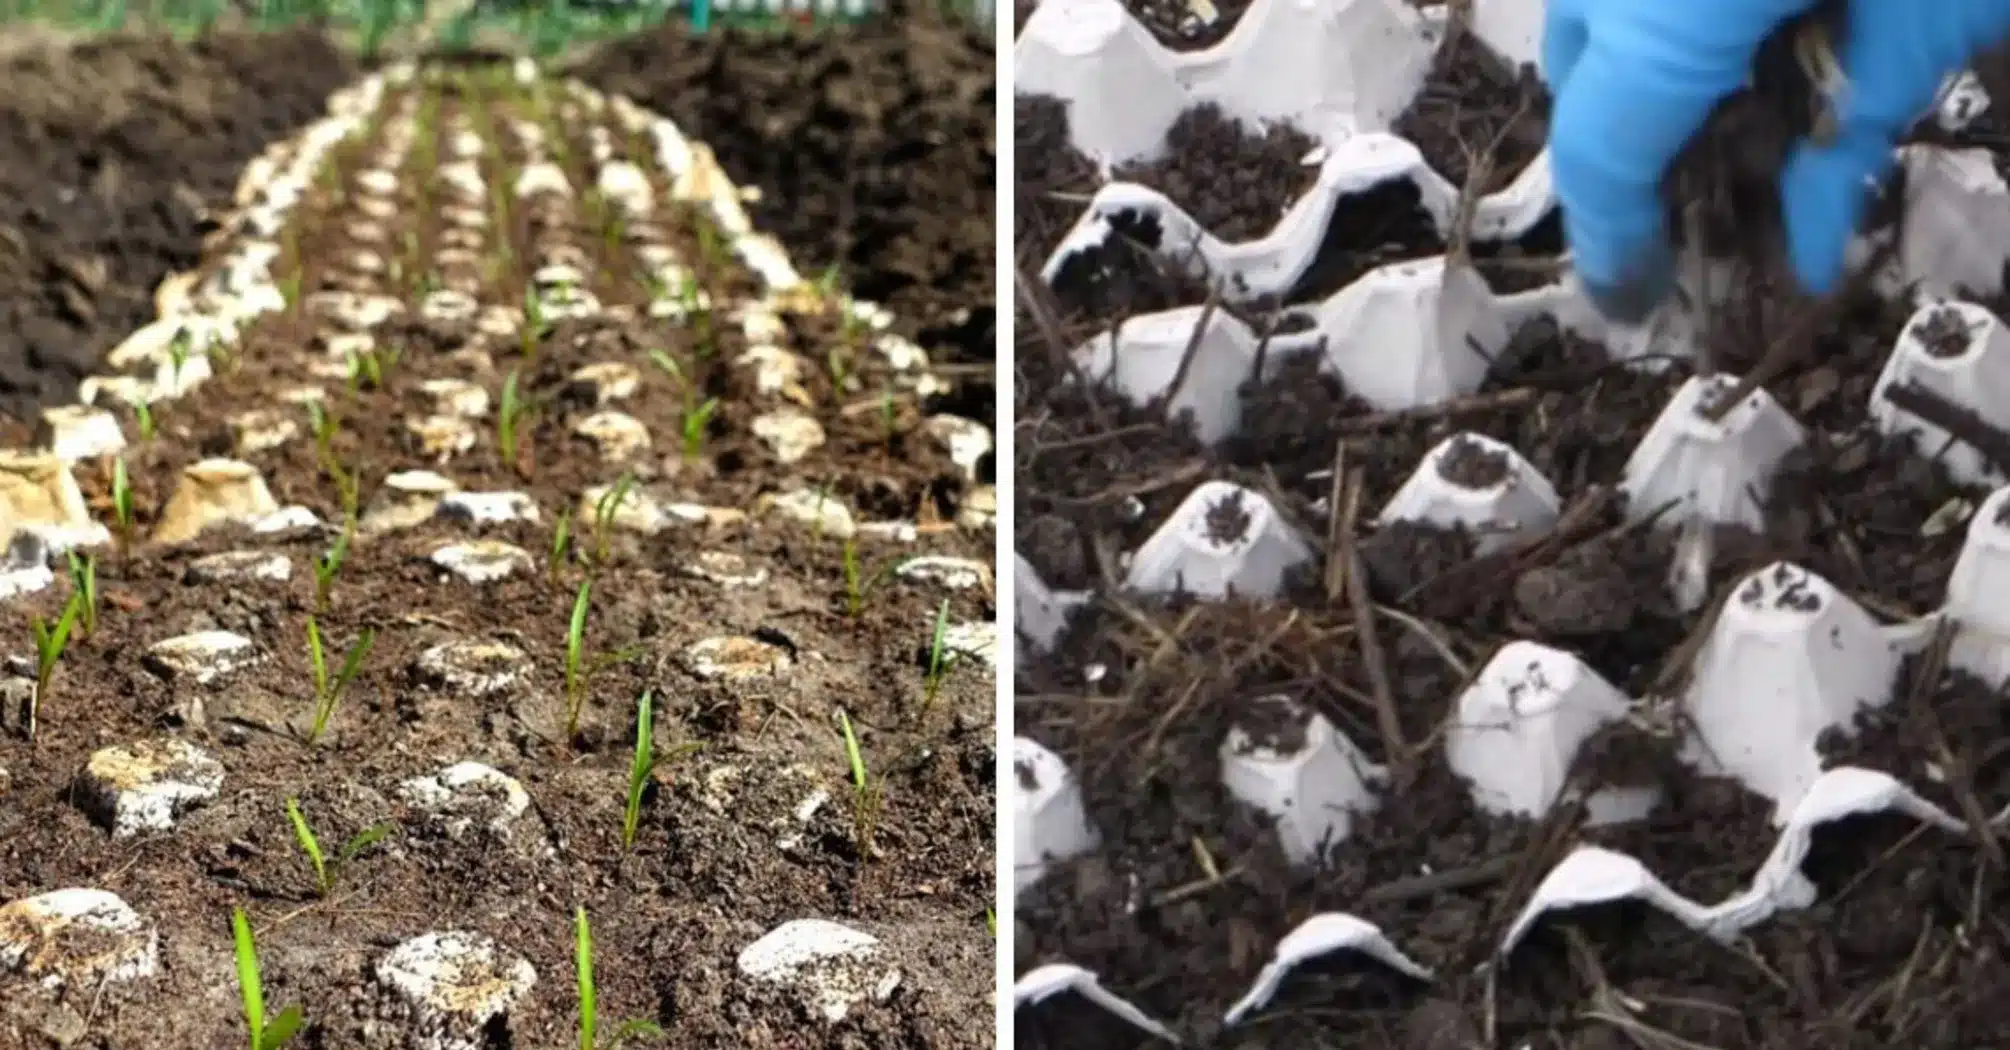
An egg tray provides a ready-made grid.
This method can help you:
- Space carrot seeds more evenly
- Reduce excessive thinning
- Keep rows organized
- Make tiny seeds easier to handle
- Reuse biodegradable cardboard
- Plant efficiently in raised beds and small gardens
It’s particularly useful for gardeners who dislike the tedious process of thinning hundreds of crowded carrot seedlings.
But the tray shouldn’t become a permanent barrier around the developing roots. Preparing it correctly is essential.
1. Choose the Right Egg Tray
Use plain cardboard or molded-paper egg cartons.
Avoid plastic and foam trays completely. They will not break down in the soil and can restrict roots while adding unnecessary plastic to the garden.
Also avoid cardboard that is heavily coated, glossy, waxed, or contaminated with food residue.
Best choice:
Plain, uncoated molded-paper/cardboard egg trays.
Remove labels or stickers if necessary.
If you’re uncertain about the materials used in a particular carton, simply use it as a spacing template rather than burying it.
2. Remove the Bottom of Each Egg Cup
This is probably the most important step.
Carrots produce a taproot that wants to grow downward through loose soil. If the bottom of the egg compartment remains intact and doesn’t decompose quickly enough, the young root may hit that barrier.
That can potentially contribute to short, forked, twisted, or otherwise misshapen carrots.
Use scissors to cut a generous opening in the bottom of every compartment.
Don’t make only a tiny drainage hole.
You want the developing carrot root to have easy access to the garden soil underneath.
Remember:
The egg tray should guide spacing—not become a container for the mature carrot.
This simple modification makes the technique much more suitable for root vegetables.
3. Prepare the Carrot Bed First
Good soil matters far more to carrot success than the egg tray itself.
Carrots grow best in loose, deep, stone-free soil.
Hard clods, rocks, compacted soil, and other obstacles can cause developing roots to split, fork, or bend.
Before planting, loosen the bed to a good depth and remove stones and large pieces of debris.
Carrots prefer:
- Loose soil
- Good drainage
- Few stones or hard clods
- Full sun to light shade
- Consistent moisture
Avoid adding fresh manure immediately before planting carrots. Excessively rich or poorly decomposed organic material can contribute to irregular root development.
Well-finished compost incorporated appropriately into the soil is a better choice.
4. Place the Egg Tray Directly on the Soil
Once the bed is prepared, place your modified cardboard egg tray directly onto the soil.
Press it down gently so the bottom of the tray makes good contact with the earth.
This is important.
You don’t want a large air gap underneath because the young roots need to move easily from the tray into the soil.
If you’re using several trays, position them side by side to create a larger planting grid.
This can be particularly convenient in:
- Raised beds
- Square-foot gardens
- Small vegetable plots
- Children’s gardens
Once they’re arranged, you’re ready to fill them.
5. Fill the Compartments With Fine Soil
Fill each egg compartment with fine, loose potting mix or sifted garden soil.
Avoid large pieces of bark or coarse material because carrot seeds are tiny and need relatively close contact with moist soil.
Gently settle the soil without packing it down firmly.
Remember, you’re trying to create an easy pathway for the root.
Quick tip:
Moisten the soil slightly before sowing.
It should feel damp, not muddy.
This prevents very dry soil from pulling moisture away from the tiny seeds immediately after planting.
6. Add 1–2 Carrot Seeds to Each Section
Now comes the part where the egg tray really earns its place.
Instead of trying to sprinkle seeds evenly along a row, place one or two seeds into each compartment.
Carrot seeds can be difficult to pick up individually, so don’t worry if you occasionally drop an extra one.
If several seedlings emerge in the same compartment, you can thin them later.
Cover the seeds with a very thin layer of fine soil according to the planting depth recommended for your particular carrot variety—generally only about ¼ inch deep.
Don’t bury them deeply.
Carrot seedlings are small and may struggle to emerge through a thick layer of soil.
7. Water Very Gently
After sowing, water carefully.
A powerful stream from a hose can wash those tiny seeds out of position.
Use:
- A watering can with a fine rose
- A gentle hose setting
- A fine sprayer
Moisten the entire tray and the soil beneath it thoroughly.
The cardboard will absorb water and become soft.
That’s exactly what you want if you’re leaving it in place.
As it repeatedly gets wet and interacts with soil organisms, untreated cardboard should gradually begin breaking down.
8. Keep the Surface Consistently Moist
Carrot germination requires patience.
Unlike radishes, which can seem to appear almost overnight, carrots may take one to three weeks to germinate depending on temperature, variety, and growing conditions.
During that period, the upper layer of soil must not repeatedly dry out.
This is especially challenging during warm weather because shallowly planted carrot seeds can dry very quickly.
During germination:
- Check the bed daily.
- Water gently when needed.
- Don’t flood the tray.
- Don’t allow the seed layer to become bone-dry.
- Be patient.
Once seedlings establish deeper roots, you can gradually shift toward deeper watering.
9. Thin the Seedlings If Necessary
If you planted two or three seeds in a compartment and all of them germinate, you’ll need to thin them.
Crowded carrots compete for space and may produce small or misshapen roots.
Keep the strongest seedling.
Instead of pulling the unwanted seedling and potentially disturbing the roots of the one beside it, you can carefully snip the weaker seedling at soil level with small scissors.
This leaves the stronger carrot undisturbed.
Why thinning matters:
A carrot needs enough space underground to expand.
Perfect germination isn’t useful if ten plants are fighting for the same inch of soil.
Check the recommended final spacing for your particular carrot variety, because larger carrots need more room than small or baby types.
10. Let the Cardboard Break Down
Once the carrots begin growing, you don’t need to lift the entire tray out of the bed if you’ve used suitable biodegradable cardboard and opened the bottoms.
Moisture, soil organisms, and weather should gradually soften and decompose it.
However, check it occasionally.
If the cardboard remains unusually tough or begins interfering with seedlings, carefully tear away portions around the plants.
This is why cutting the bottoms out before planting is so important—the carrot roots already have an unobstructed route into the soil even if the upper cardboard takes longer than expected to disappear.
An Even Safer Method: Use the Tray Only as a Template
There’s another way to use this hack that completely eliminates concerns about cardboard restricting the carrots.
Prepare your garden bed and place an empty egg tray on top.
Press it firmly into the loose soil.
Then remove it.
The compartments leave a pattern of evenly spaced indentations.
Drop carrot seeds into those marks, cover lightly, and water.
Why this version is useful:
- Nothing remains around the roots.
- You still get even spacing.
- There’s no concern about slow cardboard decomposition.
- It works with any suitable egg tray used only as a template.
For gardeners with heavy soil or unusually thick egg cartons, this may actually be the better method.
You get the spacing advantage without burying the carton.
Can You Start Carrots Indoors in Egg Cartons?
This is where the technique is often misunderstood.
Egg cartons are commonly used as miniature seed-starting containers for tomatoes, peppers, herbs, and flowers.
Carrots are different.
Carrots develop a taproot very early and generally do not like being transplanted. If the young root becomes bent or damaged during transplanting, the mature carrot may become forked or misshapen.
For that reason, it’s usually better to sow carrots directly where they will grow.
If you’re using the egg-tray method, place the tray in the final garden bed or container from the beginning rather than growing carrots in it indoors and transplanting them weeks later.
Which Carrots Work Best With This Method?
Almost any carrot can be spaced with an egg tray, but the method is particularly convenient for smaller or medium-sized varieties.
If your soil is shallow or heavy, consider shorter carrot types rather than very long varieties.
Long carrots require deep, loose soil to develop properly.
For containers or shallow beds, look for:
- Short-rooted carrots
- Round carrots
- Baby varieties
- Nantes-type carrots
If you want long, straight carrots, prepare a much deeper layer of loose soil beneath the tray.
The egg tray controls spacing at the surface. The soil underneath determines what kind of root you ultimately harvest.
Growing Carrots in Containers With Egg Trays
This trick isn’t limited to garden beds.
It can work particularly well in a wide, deep container.
Fill the container with loose growing medium, place your prepared tray on top, fill the compartments, and sow the seeds.
Just make sure the container is deep enough for your chosen carrot variety.
Container carrots need:
- Adequate depth
- Drainage holes
- Loose potting mix
- Plenty of sunlight
- Consistent watering
Containers can dry faster than garden soil, so monitor moisture carefully during germination.
What to Do After the Carrots Sprout
Once you see those first delicate green leaves, continue treating the seedlings gently.
Don’t suddenly allow the soil to alternate between soaking wet and extremely dry.
As plants become established, water more deeply so moisture penetrates down into the root zone.
Remove weeds while they’re small.
Large weeds growing among carrots are difficult to pull without disturbing the developing roots.
After germination:
Thin → weed carefully → water consistently → let the roots grow undisturbed.
Carrots don’t need constant attention once they’re established.
They mostly need time and good soil.
Don’t Overfeed Carrots
Carrots don’t need enormous quantities of nitrogen fertilizer.
Too much nitrogen may encourage impressive leafy tops without giving you the root development you’re hoping for.
Avoid assuming that bigger foliage automatically means bigger carrots.
If your soil is already reasonably fertile and contains well-decomposed organic matter, heavy feeding may be unnecessary.
A soil test can help if you’re unsure about fertility.
Common Egg-Tray Carrot Mistakes
1. Leaving the Carton Bottom Completely Closed
This may create an unnecessary obstacle for the taproot.
Better: Cut generous openings underneath each compartment.
2. Using Plastic or Foam Trays
These won’t biodegrade.
Better: Use plain molded paper/cardboard—or use the tray only as a spacing template.
3. Starting the Carrots Indoors and Transplanting Later
Carrots generally dislike root disturbance.
Better: Sow them in their final growing location.
4. Burying Seeds Too Deeply
Tiny carrot seeds don’t need a thick layer of soil.
Better: Cover them lightly.
5. Letting the Soil Dry During Germination
This is one of the most common reasons for poor carrot emergence.
Better: Keep the upper layer consistently moist until seedlings establish.
6. Forgetting to Thin
Even beautifully spaced compartments can become crowded if several seeds germinate in each one.
Better: Keep the strongest seedlings and snip extras.
7. Expecting the Tray to Fix Bad Soil
An egg carton cannot make carrots grow straight through rocks or heavily compacted ground.
Better: Prepare deep, loose soil first.
When Can You Harvest Your Carrots?
Harvest time depends on the variety.
Some baby carrots mature relatively quickly, while larger varieties require considerably longer.
Check your seed packet for the approximate days to maturity.
You can also look at the shoulder of the carrot where it meets the soil. Once it has developed a good diameter and appropriate color, gently test one.
Loosen the surrounding soil before pulling, particularly if the ground is firm.
And don’t feel obligated to harvest the entire bed at once.
You can pull the largest carrots first and leave smaller ones a little longer.
Why This Hack Is Worth Trying
The egg-tray method won’t magically produce perfect carrots. Soil quality, variety, moisture, sunlight, temperature, and final spacing still matter much more.
What the tray does exceptionally well is solve one annoying problem: handling and spacing tiny seeds.
The best gardens don’t just brighten your yard – they become something you can enjoy season after season.
If you’re ready to grow your own backyard pharmacy, the Medicinal Garden Kit is a wonderful place to begin.
Inside you’ll find 2,409 non-GMO seeds, a detailed Herbal Medicinal Guide, and 2 FREE bonuses to help you grow a wide variety of traditional medicinal herbs with confidence.
Take a look at the Medicinal Garden Kit and start growing something truly rewarding.