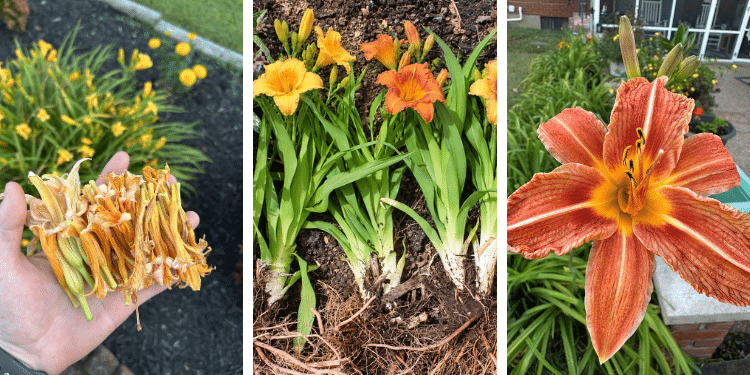
By September, daylilies can look as though they’ve finished their job for the year. The spectacular flowers of early and midsummer are mostly gone, flower stalks have turned brown, and some of the long green leaves may be yellowing around the edges.
It’s easy to look at them and think, I’ll deal with those next spring.
But September is actually an excellent time to give daylilies a little attention.
Daylilies (Hemerocallis) are remarkably tough perennials, but what happens after flowering still matters.
Healthy foliage continues producing energy, roots continue developing while soil temperatures remain favorable, and overcrowded clumps can be divided so they have more room to grow.
The good news is that daylilies don’t require complicated fall care.
In fact, seven relatively simple September jobs can help you prepare healthier, stronger plants with the potential for a much better flower display next year.
1. Remove the Old Flower Stalks
Start with the easiest job: remove the old flower stalks, often called scapes.
Once flowering has completely finished and the stalk has turned brown or dry, it no longer adds much to the appearance of the plant.
Cut the old scape down near its base using clean pruning shears.
You can also gently remove any remaining spent flowers or developing seed pods if you aren’t intentionally saving seed.
Why remove seed pods?
Producing mature seeds requires energy.
If your goal is strong established plants rather than breeding daylilies from seed, removing developing seed pods allows the plant to direct resources elsewhere.
Keep in mind that removing seed pods isn’t a magical trick that guarantees more flowers next year. Overall plant health, sunlight, moisture, age, variety, and crowding are much more important.
September note:
Remove brown flower stalks, but don’t automatically remove all the green leaves.
Those leaves still have work to do.
2. Leave Healthy Green Foliage Alone
This may be the most important September daylily rule.
Don’t cut down perfectly healthy green foliage simply because flowering has finished.
Daylilies use their leaves to photosynthesize, producing carbohydrates that support the roots and crown.
As long as the leaves remain green, they’re still functioning.
Eventually, dormant varieties will naturally yellow and die back as colder weather arrives. That’s the appropriate time to remove the dead foliage.
In September, remove only:
- Completely yellow leaves
- Brown leaves
- Damaged foliage
- Obviously diseased material
- Dead flower stalks
Leave healthy green leaves standing.
Why?
Think of those leaves as solar panels feeding the underground plant.
Removing them too early reduces the amount of time the plant has to gather and store energy before dormancy.
A slightly untidy plant in September may contribute to a stronger plant next spring.
3. Divide Overcrowded Daylilies
If your daylily clump has become enormous but flowering isn’t what it used to be, September may be the perfect time to divide it.
Daylilies gradually expand into dense clumps.
After several years, plants can become crowded enough that competition for water, nutrients, light, and physical space increases.
Signs your daylilies may need dividing:
- The clump has become very large.
- Flowering has gradually declined.
- Flowers seem smaller or less numerous.
- The center of the clump looks weak or empty.
- Plants are spreading into neighboring perennials.
- Individual fans are extremely crowded.
You don’t need to divide daylilies every year.
Healthy clumps can remain undisturbed for several years.
But when performance begins declining, division can rejuvenate them.
How to Divide Daylilies
Water the plant a day before dividing if the soil is very dry.
Then:
1. Dig around the entire clump – Insert your garden fork or spade several inches away from the foliage to avoid cutting through too many roots.
2. Lift the clump – Work gradually around it until you can lift the root mass.
3. Remove excess soil – Shake or gently wash away enough soil to see where individual fans join the crown.
4. Separate the clump – Pull sections apart by hand where possible or carefully divide very dense clumps with an appropriate clean tool.
5. Keep healthy divisions – Each section should contain healthy roots and foliage.
6. Replant promptly – Don’t allow exposed roots to sit in hot sun for hours.
Why September can work well
The intense heat of summer is beginning to ease while the soil can remain warm enough for root establishment.
However, climate matters.
In regions where hard freezes arrive very early, divide daylilies earlier so they have time to establish before the ground freezes.
4. Replant Them at the Correct Depth
Dividing daylilies won’t help much if you replant them incorrectly.
Look for the crown, the area where the foliage meets the roots.
Plant the division so the crown sits close to the soil surface rather than being buried deeply.
Spread the roots naturally through the planting hole and fill around them with soil.
Firm gently and water thoroughly.
Give them enough room
Don’t immediately recreate the overcrowded clump you just divided.
Spacing varies according to the mature size of the cultivar, but remember that daylilies will expand again.
Give each division room to develop.
Helpful tip:
If you suddenly have far more divisions than you need, that’s normal.
One mature clump can produce many new plants.
Use extras to:
- Extend an existing border.
- Plant along a walkway.
- Fill bare areas.
- Create a mass planting.
- Share with friends and neighbors.
September division is one of the easiest ways to turn one daylily planting into several.
5. Keep Them Properly Watered
Summer may be ending, but don’t put the hose away automatically.
Daylilies are tough once established, but adequate moisture still matters—especially after division or during a dry autumn.
Newly divided plants need consistent moisture while they develop new roots.
After dividing:
Water thoroughly immediately after planting.
Then monitor the soil over the following weeks.
Keep it reasonably moist but not permanently waterlogged.
For established daylilies:
Water when conditions are unusually dry.
Deep, occasional watering is generally more useful than repeatedly wetting only the surface.
One common mistake:
Gardeners often stop watering everything as soon as temperatures cool.
But cooler weather doesn’t automatically mean moist soil.
If September is warm and dry, plants may still need supplemental water.
Quick check:
Push your finger into the soil several inches away from the crown.
If the root zone is dry, it’s probably time to water.
6. Clean Up Around the Plants
By September, the base of a mature daylily clump can become surprisingly messy.
You may find:
- Dead leaves
- Broken flower stalks
- Weeds
- Fallen petals
- Old mulch
- Garden debris
A little cleanup improves appearance and makes it easier to inspect the plant.
Remove dead material that has collapsed around the crown, particularly anything that appears diseased.
Pull weeds before they produce and scatter mature seeds.
But don’t overdo it.
You don’t need to strip the soil completely bare or remove every piece of organic material from the garden.
Focus on keeping the daylily crown reasonably open and preventing weeds or thick mats of wet debris from smothering it.
Check for disease while you’re there
September is also a good time to examine leaves closely.
Some yellowing late in the season is completely natural.
But unusual spotting, streaking, or widespread damage deserves a closer look.
Remove clearly diseased foliage and dispose of it appropriately rather than leaving it piled beneath the plant.
Remember:
Normal autumn yellowing and plant disease aren’t necessarily the same thing.
Don’t panic simply because an older leaf turns yellow.
7. Add Compost and Refresh the Mulch – But Don’t Overfeed
Once you’ve cleaned around the plants, you can improve the bed for the coming season.
A modest layer of finished compost around established daylilies can contribute organic matter and gradually improve the soil.
There’s no need to bury the plant in compost.
Spread it around the root zone while keeping the crown visible.
You can also refresh mulch if necessary.
A light mulch layer can help:
- Suppress weeds
- Reduce moisture loss
- Moderate soil-temperature fluctuations
- Protect the soil surface
But avoid piling mulch directly over the crown.
Think of mulch as a blanket around the plant—not a blanket over its face.
What About Fertilizer?
Don’t assume daylilies need a heavy dose of fertilizer simply because flowering has finished.
Excessive nitrogen can encourage lots of foliage without necessarily improving flowering.
If your plants are healthy and your soil is reasonably fertile, heavy September feeding may be unnecessary.
A soil test is the best way to know whether important nutrients are actually deficient.
September goal:
Improve the soil rather than trying to force a burst of tender new growth.
In cold climates especially, late-season fertilization that pushes lots of soft growth isn’t desirable.
Should You Cut Daylilies Back in September?
Not necessarily.
This is one of the most common questions about fall daylily care.
If the foliage is still healthy and green, leave it.
Once foliage has naturally turned yellow or brown and begun collapsing—often following colder weather or frost—you can cut it back.
Use clean shears and remove the dead leaves to a few inches above the crown.
Alternatively, completely dead foliage can sometimes be pulled away gently.
Don’t force it.
If leaves resist strongly, cut them rather than tugging hard enough to disturb the crown.
The simple rule:
Green = leave it.
Yellow/brown and dead = clean it up.
That makes September daylily care much easier.
Don’t Ignore the Center of an Old Clump
Take a close look at large daylily clumps.
If the outside appears vigorous while the center looks weak or sparse, the plant may have been growing undisturbed for a long time.
This is a classic sign that division may be worthwhile.
Instead of simply adding fertilizer around the old clump, lift it and inspect what’s happening underground.
Remove weak or damaged sections and replant vigorous divisions with adequate spacing.
Next year, those smaller divisions may initially look less impressive than the enormous original clump.
Give them time.
Once established, they can develop into healthier, more productive plants.
What NOT to Do to Daylilies in September
Good fall gardening is often about restraint.
Don’t cut healthy green foliage to the ground.
The leaves can continue supporting the plant while they’re green.
Don’t divide plants immediately before severe freezing weather.
Give new divisions time to establish.
Don’t bury the crown deeply.
Keep it near the soil surface.
Don’t drown newly divided plants.
Moist soil is helpful; permanently saturated soil isn’t.
Don’t pile mulch over the crown.
Keep mulch around rather than directly on top of the plant.
Don’t assume yellow leaves automatically mean fertilizer deficiency.
Some late-season yellowing is simply part of dormancy.
Don’t heavily fertilize without knowing the plant needs it.
More fertilizer doesn’t automatically mean more flowers.
Daylilies are famous for being tough, forgiving plants, which is exactly why they’re so easy to neglect after flowering.
But a little September attention can help keep them healthy and productive for years.
The best gardens don’t just brighten your yard – they become something you can enjoy season after season.
If you’re ready to grow your own backyard pharmacy, the Medicinal Garden Kit is a wonderful place to begin.
Inside you’ll find 2,409 non-GMO seeds, a detailed Herbal Medicinal Guide, and 2 FREE bonuses to help you grow a wide variety of traditional medicinal herbs with confidence.
Take a look at the Medicinal Garden Kit and start growing something truly rewarding.