Daylilies (Hemerocallis) are among the most reliable, rugged, and breathtaking perennials in the modern landscape.
They tolerate poor soil, brave the intense heat of mid-summer, and reward gardeners with an abundance of vibrant, trumpet-shaped flowers.
However, their botanical name drops a major hint about their unique growth habit: Hemerocallis translates literally from Greek as “beauty for a day.”
Every individual daylily blossom opens at dawn, reaches peak maturity by afternoon, and perishes by nightfall.
Fortunately, a single mature flower stalk – known botanically as a scape – carries a dense cluster of multiple buds that open in a tight sequence over several weeks.
When left to nature, a faded daylily bloom drops its petals and immediately begins transforming its base into a green, swollen seed pod. This reproductive process requires a massive expenditure of cellular energy and carbohydrates.
By stepping in to deadhead your daylilies—the practice of manually removing faded flowers and developing seed pods—you rewrite the plant’s hormonal programming. Instead of wasting resources on seeds, the daylily channels its energy back down into the root system.
The Anatomy of a Daylily Scape: What to Keep and What to Cut
To deadhead daylilies effectively without accidentally sabotaging your future floral display, you must understand the architecture of the flower stalk.
          ( Fresh, Vibrant Bloom )
                     │
         [ Unopened Bud ]    [ Unopened Bud ] <-- DO NOT TOUCH
               │                   │
               ├───┬───────────────┘
               │
       [ Spent Bloom ] <-- Snap or snip cleanly at the very base
               │
         [ Stem Joint ]
               │
               ▼
       [ Main Green Scape ] <-- Leave intact until all buds are gone
Unlike some perennials where an entire stem can be sheared off after blooming, daylilies produce their flower buds along branching points on a single scape.
A single scape might hold anywhere from 10 to over 30 buds, all at completely different stages of development.
-
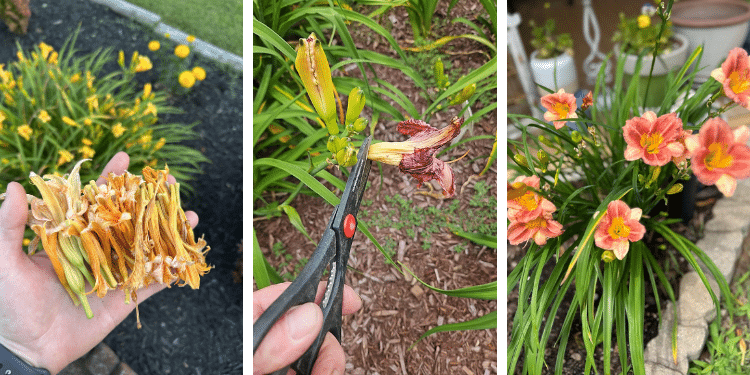
The Spent Bloom: This is yesterday’s flower. It appears as a wet, collapsed, or withered tube of dark, gooey petals hanging loosely from the branch.
-
The Unopened Bud: These look like smooth, elongated green capsules or tear-drops. They sit directly adjacent to the spent blooms. They are highly fragile and must be preserved at all costs.
-
The Seed Pod: If a spent bloom is missed for a few days, the petals will fall off entirely, revealing a hard, expanding green nub directly at the stem joint. This is the seed factory that must be removed.
Step-by-Step Guide: How to Deadhead Daylilies for Maximum Yield
Deadheading is best approached as a calming, habitual garden walkthrough. When executed with the correct technique, it takes only a few minutes per plant.
Step 1: The Timing of the Walkthrough
The absolute best time to deadhead daylilies is in the morning. Yesterday’s flowers will have collapsed fully, making them instantly distinguishable from the freshly opened blossoms of the day.
Furthermore, doing this early prevents a common mid-summer issue: when spent daylily blooms sit under a hot, humid afternoon sun, they turn into sticky, waterlogged tubes.
These gooey tubes can drape themselves over neighboring unopened buds, trapping moisture against them and causing the healthy buds to develop fungal rot or drop off before opening.
Step 2: The Downward-Snap Technique
You do not necessarily need tools to deadhead individual daylily blossoms; your fingers are often the most precise tool available.
Grasp the withered, tube-like spent bloom firmly near its base, right where it connects to the green stem branch.
Pinch the base between your thumb and forefinger, and give it a sharp, clean downward snap. If the bloom is truly spent, it will break away cleanly with a distinct “pop.”
Safety Warning for Buds: Avoid pulling or yanking the faded bloom toward your body. Pulling introduces lateral tension that can easily snap the brittle main stem or inadvertently tear off the tender, unopened buds sitting directly next to your target.
Step 3: Utilizing Micro-Tip Shears for Stubborn Varieties
Some modern tetraploid daylily varieties have incredibly thick, fibrous stems that do not snap away easily by hand. For these, or if you simply prefer using tools, deploy a pair of stainless steel micro-tip pruning shears or floral snips.
Slip the narrow blades directly behind the base of the faded flower tube and snip. Make the cut as close to the branching joint as possible without nicking the main stem.
Step 4: Hunting Down and Eradicating Seed Pods
If you go away on vacation or skip your deadheading routine for a week, your daylilies will quickly shift into seed production mode.
Examine your plants for bare green stems ending in a hard, three-lobed capsule. Even if the colorful petals are completely gone, these seed pods must be snipped off immediately.
Once the plant recognizes it is no longer successfully producing seed, it will reset its biochemical pathways and focus once again on flower development.
Step 5: Cleaving the Exhausted Scapes
Eventually, every single bud on a flower stalk will have completed its 24-hour cycle. You will be left with a naked, branching green stick protruding out of the foliage mound. Left alone, this scape will slowly wither, turning an unsightly yellow, then an ash-brown.
Once a scape has zero remaining buds, follow the stalk all the way down to its origin point deep inside the center of the leafy fan. Using a sharp pair of bypass pruners, cut the scape off at a 45-degree angle, roughly 1 to 2 inches above the crown of the plant.
The angled cut prevents irrigation water or rain from pooling on top of the open wound, which can invite crown rot. Removing these spent scapes instantly cleans up the silhouette of the plant, leaving you with a beautiful, fountain-like mound of architectural green foliage.
4 Critical Rules for Daylily Care and Performance
To keep your daylilies performing like high-efficiency flower factories all summer long, integrate these essential cultural practices into your routine:
1. Maintain Strict Tool Hygiene
Daylilies are susceptible to a highly contagious fungal pathogen known as Daylily Rust (Puccinia hemerocallidis), as well as leaf streak viruses.
If you are using pruning shears to deadhead, keep a small spray bottle of isopropyl alcohol or a sanitizing wipe in your pocket.
Clean the blades thoroughly when moving from one separate daylily clump to another to avoid tracking invisible fungal spores across your garden beds.
2. Guard Your Clothing Against Pigment Stains
The wet, gooey fluid inside spent daylily flowers—especially rich red, deep purple, and vibrant orange varieties—contains highly concentrated natural pigments and tannins.
These fluids can permanently stain clothing, canvas gardening aprons, and porous leather gloves. Wear washable synthetic gloves and older clothing during your morning deadheading walks.
3. Supply Consistent Mid-Summer Moisture
The formation of new flower buds requires a tremendous amount of hydration. If the soil drys out completely during a scorching July or August heatwave, even a perfectly deadheaded repeat-blooming daylily will stall out and refuse to produce new scapes.
Ensure your daylilies receive at least 1 to 1.5 inches of water per week. Water deeply at the root zone rather than spraying the tops of the plants, as wet foliage invites fungal issues.
4. Apply a Mid-Season Nutrient Boost
By mid-summer, daylilies have exhausted much of the readily available nutrients in the upper soil profile from their initial spring growth surge.
To fuel a robust secondary flush of autumn blooms, pull back any mulch around the base of the plant in mid-July and scratch a 1-inch layer of rich organic compost or a balanced, slow-release organic fertilizer into the soil around the root zone. Push the mulch back into place and water deeply to wash the nutrients down to the roots.
While it can be tempting to let nature take its course, the minimal effort required to deadhead daylilies yields a massive return on your investment.
Not only does it instantly elevate the visual appeal of your landscape by eliminating messy, decaying brown tissue, but it actively forces your plants to perform at their genetic maximum.