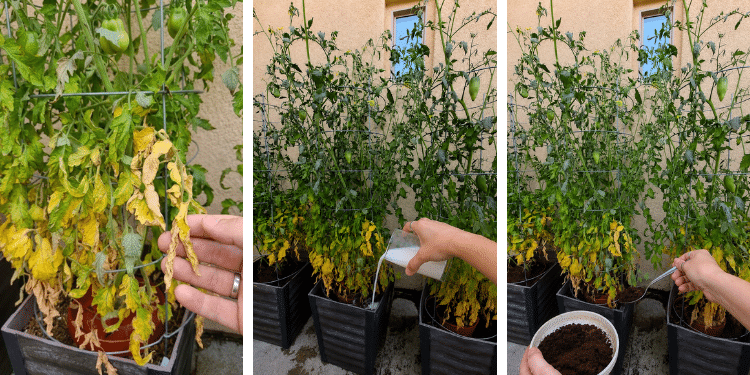
Few things match the excitement of watching your tomato plants grow, but that joy can quickly turn to frustration when you notice the lower leaves turning a pale, sickly yellow.
This common symptom, known as chlorosis, is your plant’s way of flashing a warning light. It means the leaves are losing their chlorophyll – the green pigment required to turn sunlight into food energy.
Because tomatoes are fast-growing, heavy-feeding vines, a drop in chlorophyll will rapidly stall fruit production and leave the plant vulnerable to pests.
To reverse the damage, you have to diagnose the underlying cause and apply targeted, organic amendments.
The Chlorosis Diagnosis: What is Causing the Yellowing?
Before applying a homemade remedy, you need to look at where and how the yellowing is occurring. Treating a watering issue with fertilizer can shock the roots, while ignoring a fungal infection can ruin your entire crop.
-
Magnesium Deficiency (Interveinal Chlorosis): If the leaves are turning yellow but the structural veins remain dark, sharp green, your plant is starving for magnesium. Magnesium is the core atom of the chlorophyll molecule; without it, photosynthesis breaks down.
-
Overwatering and Suffocation: If the leaves look yellow, limp, and droopy all over the plant, the root zone is likely waterlogged. Excess water drives oxygen out of the soil, causing the roots to suffocate and lose their ability to draw up nutrients.
-
Early Blight (Fungal Pathogen): If the yellowing starts as irregular patches on lower leaves and is accompanied by dark, concentric target-like rings or black spots, your plant is battling a soil-borne fungus.
4 Powerful Homemade Solutions That Work Fast
1. The Used Coffee Ground Scratch (Fast Nitrogen Booster)
If your diagnosis points to a nitrogen deficiency (uniform yellowing at the base), used coffee grounds are an excellent, budget-friendly pantry amendment.
-
The Science: While fresh coffee is highly acidic, used grounds have had most of their soluble acids washed away, leaving them near-neutral in pH (around 6.5 to 6.8), which is the exact sweet spot for tomatoes. They contain roughly 2% nitrogen by volume, along with trace amounts of magnesium and potassium.
-
How to apply it: Spread your used coffee grounds thinly on a baking sheet to dry completely (wet grounds can clump and mold). Gently scratch 2 to 3 tablespoons of the dry grounds into the top two inches of the soil around the base of your tomato plant, keeping them a few inches away from the main stem. As soil microbes break down the grounds, they release a steady, metered stream of bioavailable nitrogen.
2. The Epsom Salt Foliar Spray (Instant Magnesium Fix)
When leaves exhibit interveinal chlorosis (yellow leaves with green veins), applying fertilizer to the soil can take weeks to show results. A foliar spray bypasses the root system entirely, delivering nutrients directly into the leaf’s cellular pores for rapid recovery.
-
The Science: Epsom salt is not sodium; it is magnesium sulfate. Because magnesium is highly mobile within plant tissue, spraying it directly onto the foliage allows the plant to synthesize fresh chlorophyll within 48 to 72 hours.
-
How to make it: Dissolve 1 tablespoon of pure, unscented Epsom salt into 1 gallon of warm water. Pour the solution into a clean spray bottle and add 2 to 3 drops of liquid castile soap (this acts as a surfactant, helping the liquid stick to the sandpapery tomato leaves instead of rolling off).
-
Application: Mist the tops and underscores of the yellowing leaves thoroughly. Crucial Rule: Only spray in the early morning or late evening. Applying a liquid spray during the heat of a baking midday sun will act like a magnifying glass, scorching the foliage.
3. The Balanced Liquid Scraps Tea (All-Purpose Nutrient Recharge)
If you want to provide your tomatoes with an all-purpose mineral boost that feeds both the plant and the living microbiology of the soil, you can brew a liquid fertilizer tea using everyday kitchen by-products.
-
The Recipe: Collect the peels of 2 potatoes (for trace minerals and starches), 2 banana peels (for a heavy dose of potassium), and the washed, crushed shells of 3 eggs (for structural calcium). Place them into a large glass jar and fill it with 1 gallon of unchlorinated water (rainwater or dechlorinated tap water is ideal). Let the mixture steep at room temperature for 3 to 5 days to ferment gently.
-
Application: Strain the amber liquid into a watering can. Water the root zone of your yellowing tomato plants deeply with this infusion once every two weeks. It delivers a gentle, well-rounded nutritional recharge without the risk of synthetic root burn.
4. The Hydrogen Peroxide Cleanse (Fungal & Suffocation Shield)
If your tomato leaves are turning yellow due to waterlogged, compacted soil or early signs of fungal spots, household hydrogen peroxide is a powerful tool to clean the root zone.
-
The Science: Hydrogen peroxide looks like water, but it carries an extra atom of oxygen. When it hits the soil, it breaks down rapidly, releasing a surge of pure oxygen that instantly destroys anaerobic fungal spores and aerates suffocated root tissues.
-
How to make it: Mix 2 tablespoons of standard 3% household hydrogen peroxide into 1 gallon of clean water.
-
Application: Pour this solution directly over the soil around the root zone of your troubled plants. It cleanses the subterranean environment, encourages healthy root respiration, and allows the plant to resume efficient nutrient uptake.
Tomato Leaf Quick-Recovery Protocol
To turn your tomato plants around smoothly without shocking their delicate vascular networks, follow this step-by-step management sequence:
Yellow leaves are a natural part of growing tomatoes, but they require quick action.
By matching the pattern of the yellowing to the right organic remedy – whether it’s boosting nitrogen with coffee grounds, reversing a magnesium deficiency with an Epsom salt mist, or cleaning the soil with a peroxide drench – you address the root cause of the distress.