Starting seeds at home is one of the most rewarding and cost-effective ways to grow your own vegetables, herbs, and flowers.
However, maintaining the right conditions for germination—such as warmth, humidity, and light—can be tricky, especially in early spring.
The good news? You don’t need to buy fancy seed-starting kits or greenhouse trays. Instead, you can repurpose old plastic containers into mini greenhouses that are perfect for sprouting seeds indoors.
Reusing materials like salad clamshells, water bottles, or takeout containers not only saves money, but also supports a more sustainable, zero-waste gardening approach.
These makeshift greenhouses create the warm, moist environment that seeds need to germinate successfully—no expensive equipment required.
In this guide, we’ll cover how to turn old plastic containers into mini greenhouses, why this method works so well, and which types of seeds thrive in these upcycled environments.
Why Use Plastic Containers as Mini Greenhouses?
Old plastic containers are ideal for seed starting because they retain heat and moisture, creating a microclimate that mimics the effect of a real greenhouse.
This environment keeps the soil consistently warm and humid, which speeds up germination and protects tender seedlings from cold drafts or fluctuating indoor temperatures.
Benefits of Repurposing Plastic Containers:
-
Eco-friendly: Reduces plastic waste and keeps containers out of landfills.
-
Cost-effective: No need to purchase seed-starting trays or dome lids.
-
Customizable: Cut, shape, or size containers to fit your windowsills or shelves.
-
Easy to label: Most plastics are easy to write on or tape labels to.
-
Portable: Lightweight and compact enough to move as needed for better light


Best Types of Plastic Containers for DIY Mini Greenhouses
Not all plastics are created equal, but many common household containers can be reused for seed starting. Look for clear or translucent containers that allow light in and are deep enough to hold soil and allow seedlings to grow.
Here are some great options:
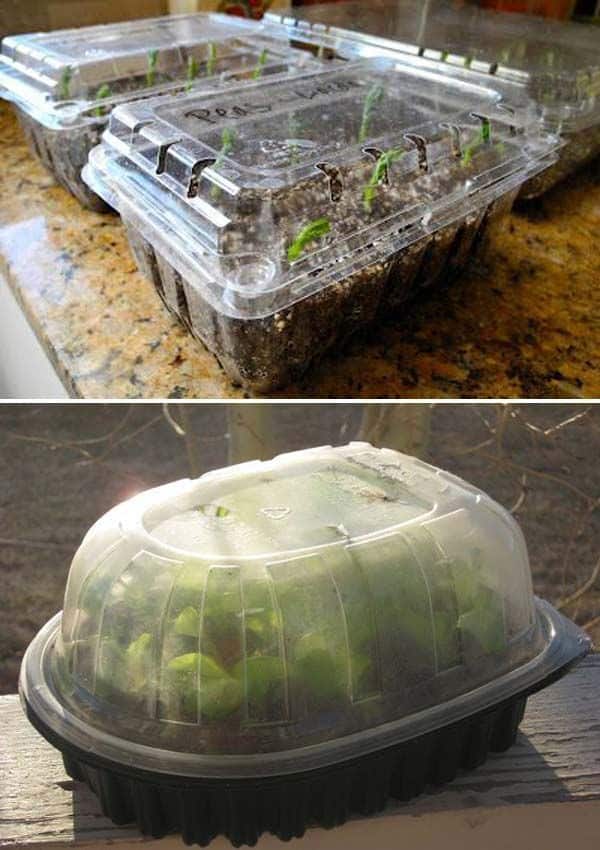
1. Clear Salad Clamshells
These containers are perfect for seed starting. They already come with a built-in lid, and the clear plastic allows maximum sunlight exposure. They’re also shallow enough for starting herbs, leafy greens, or small flowers.
2. Gallon Water Jugs or Milk Jugs
Cut a gallon jug in half and use the bottom as the seed tray. The top can be flipped over to serve as a humidity dome. Leave the cap off or poke holes in the top for ventilation.
3. Plastic Takeout or Deli Containers
Sturdy and often stackable, these containers make excellent miniature greenhouses. Just make sure to drill or poke a few drainage holes in the bottom.
4. Rotisserie Chicken Containers
These large, clear-lidded containers mimic commercial seed trays and domes very well. The depth and size make them great for starting larger vegetables like tomatoes and peppers.
5. Disposable Bakery or Pastry Containers
These often have high, domed lids which are perfect for growing taller seedlings without transplanting too early.
How to Create a Mini Greenhouse for Seed Starting
Turning an old plastic container into a mini greenhouse is quick, easy, and doesn’t require any special tools. Here’s how to do it:
Step 1: Clean the Container
Wash your plastic container with warm, soapy water to remove any food residue or oils. Rinse well and dry completely. This helps prevent mold, fungus, or bacteria from harming your seedlings.
Step 2: Add Drainage Holes
Use a knife, nail, or drill to poke several small holes in the bottom of the container for drainage. This is essential to prevent waterlogged soil and root rot. If you’re using a lid, add 1–2 small holes for airflow.
Step 3: Fill with Seed-Starting Mix
Use a light, sterile seed-starting mix—not regular potting soil. These mixes drain well and help prevent damping-off disease, a common killer of young seedlings.
Step 4: Plant the Seeds
Follow the seed packet instructions for depth and spacing. Lightly water the soil after planting to settle the seeds and hydrate the mix.
Step 5: Cover and Place in Sunlight
If your container has a lid, close it to retain moisture and warmth. If it doesn’t, cover the container with plastic wrap or a clear plastic lid. Place your mini greenhouse near a south-facing window or under a grow light where it will get 6–8 hours of light daily.
Step 6: Monitor Moisture and Temperature
Check your mini greenhouse daily. The condensation inside means it’s working! Water gently when the soil starts to dry out. Once seedlings appear, you may need to prop the lid open slightly to provide ventilation and prevent fungal growth.
Step 7: Harden Off Before Transplanting
Once your seedlings have grown large enough to handle and the weather has warmed, begin the hardening off process. Gradually introduce the seedlings to outdoor conditions over 7–10 days before transplanting them into your garden or pots.
Best Seeds to Start in a Mini Greenhouse
Mini greenhouses are great for starting many types of plants, particularly those with delicate seedlings or long growing seasons.
Ideal Seeds for Indoor Mini Greenhouses:
- Tomatoes
- Peppers (bell and chili)
- Lettuce
- Spinach
- Herbs (basil, thyme, oregano, parsley, chives)
- Broccoli and cauliflower
- Marigolds
- Zinnias
- Cucumbers (start a few weeks before transplanting)
Root crops like carrots, beets, and radishes are best sown directly in the garden, but leafy greens and fruiting vegetables love the warmth and humidity a mini greenhouse provides during germination.
Tips for Seed Starting Success
- Label your containers with the plant name and date of planting.
- Avoid overwatering; too much moisture can lead to mold or root rot.
- Rotate containers daily if placed on a windowsill to ensure even growth.
- Remove the lid once seedlings have several true leaves to prevent crowding and encourage stronger stems.
- Add a small fan nearby for airflow to reduce fungal diseases and strengthen seedlings.
Sprouting seeds at home doesn’t require a big budget or fancy equipment.
With just a little creativity and some repurposed plastic containers, you can build effective and eco-friendly mini greenhouses that help your seeds get a strong start.
Not only does this method reduce household waste, but it also empowers you to grow healthier plants right from the very beginning.
Whether you’re growing vegetables for your balcony garden, herbs for your kitchen, or flowers for your backyard beds, your DIY plastic container greenhouse is the first step toward a greener and more sustainable gardening journey.


