Looking for a charming, eco-friendly way to add character to your garden or patio? A log planter is a stunning, natural addition to any outdoor space.
Whether you’re going for a rustic, woodland-inspired garden or simply want to repurpose fallen trees or firewood, making your own log planter is a creative and sustainable project that transforms wood into a living piece of art.
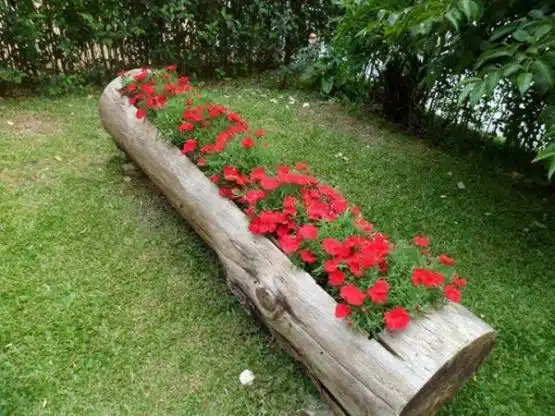
These planters are not only beautiful but also functional. You can grow flowers, herbs, succulents, or small vegetables inside them, creating a lovely contrast between the soft textures of plants and the rugged appearance of natural wood.
Plus, since they’re made from repurposed logs, they’re a budget-friendly and environmentally conscious gardening solution.
In this step-by-step guide, you’ll learn how to make a log planter from scratch, what tools you’ll need, how to prepare the log, and the best plants to grow in it.
Why Choose a Log Planter?
A log planter blends seamlessly into both modern and rustic garden designs, offering a unique, earthy aesthetic that store-bought pots simply can’t match.
Here are a few reasons to give this DIY project a try:
- Sustainable: Upcycles fallen or dead wood that would otherwise go to waste
- Budget-friendly: Minimal cost if you already have access to wood and tools
- Customizable: You can adjust the size, shape, and design to suit your style
- Durable: Logs naturally insulate plant roots and withstand outdoor elements
- Naturally Beautiful: Adds texture and organic charm to your landscape
Materials and Tools You’ll Need
To create your own beautiful log planter, gather the following supplies:
Materials:
- A log or large tree branch (preferably hardwood, 1–2 feet in length or longer)
- Potting soil suited for your chosen plants
- Plants (flowers, herbs, succulents, or small vegetables)
- Optional: landscape fabric or coconut liner
Tools:
- Chainsaw or handsaw (to cut the log)
- Chisel and hammer or wood gouge (to hollow out the center)
- Drill with large bits (for drainage holes)
- Sandpaper or sander (to smooth edges)
- Protective gear (gloves, goggles, mask)
How to Make a Log Planter – Step-by-Step
Step 1: Choose the Right Log
Look for a solid, dry log—not overly rotten or cracked. Logs between 6–12 inches in diameter are ideal. You can use driftwood, firewood, or a fallen tree branch.
If you want a larger planter, choose a longer log and make multiple planting zones along its length.
Avoid wood that has mold or fungus, as it could affect plant health. Also, make sure it’s not pressure-treated if you’re growing edibles.
Step 2: Cut the Log to Size
Using a chainsaw or handsaw, cut the log to your desired length. This could be a short 1-foot planter for tabletop use or a longer piece for garden borders.
You can also cut the base slightly flat so the planter doesn’t roll.
Optional: Cut both ends at an angle for a decorative, stylized finish.
Step 3: Hollow Out the Log
This is the most time-intensive step, but it’s what turns the log into a planter.
Method:
- Draw an outline on the top of the log where the cavity will be.
- Using a drill, create a series of deep holes within the outline (around 2–3 inches apart).
- Use a chisel and hammer to chip away the wood between holes. Repeat the process until you reach your desired depth (typically 3–6 inches).
- Smooth out the inner surface with a wood gouge or sandpaper.
This hollowed cavity will hold your soil and plants.
Step 4: Add Drainage Holes
Drainage is essential to prevent waterlogged roots. Flip the log over and drill several holes in the bottom (at least ½ inch wide). These will allow excess water to escape and help keep your plants healthy.
If you plan to use the log indoors or on a patio, consider placing a plastic tray underneath to catch runoff.
Step 5: (Optional) Line the Planter
To increase the lifespan of your log and prevent soil from escaping, you can line the interior with:
- Landscape fabric
- Coconut coir liners
- Plastic sheeting with holes
Cut the liner to fit the hollowed area, tucking it in securely. This step helps protect the wood from rot and makes it easier to replace soil when needed.
Step 6: Fill with Soil
Choose a potting mix that matches your plant type. For example:
- Use cactus/succulent mix for drought-tolerant plants
- Use organic potting soil for herbs and vegetables
- Add compost or fertilizer if needed
Fill the cavity with soil, leaving about an inch of space at the top to avoid overflow during watering.
Step 7: Plant and Water
Now comes the fun part—arranging your plants! Depending on the size of your planter, you can create a mini herb garden, a burst of colorful flowers, or a desert-style succulent display.
Some beautiful plant options include:
- Succulents (sedum, echeveria, hens and chicks)
- Trailing plants (creeping thyme, sweet alyssum)
- Herbs (basil, parsley, rosemary)
- Edible flowers (nasturtiums, pansies)
- Compact veggies (baby lettuce, radishes, spinach)
Gently pat the soil around each plant and water thoroughly to help them settle.
Where to Display Your Log Planter
A finished log planter can be showcased in countless ways:
- As a centerpiece on an outdoor dining table
- Nestled in a garden bed for a layered look
- Placed on a porch or patio for rustic charm
- Along garden paths or walkways for edging
- Mounted on stumps or rocks for height and dimension
You can even make multiple log planters of various lengths and group them for a tiered display.
Caring for Your Log Planter
- Water regularly but don’t overwater. Always ensure excess water drains.
- Replenish soil or compost each season to keep nutrients available.
- Sand or seal the outside of the log to preserve its natural look (optional).
- Replant seasonally or as needed depending on the plant types.
Over time, the wood will naturally weather and may develop moss or lichen—adding to its natural charm.
A DIY log planter is more than just a container for your plants—it’s a statement piece that brings rustic beauty, sustainability, and creativity into your garden.
With a little time and effort, you can craft a planter that complements your outdoor space while reusing natural materials in a functional and visually striking way.
So grab that log, break out your tools, and start building a piece of living art that will be admired season after season!


