The orchid, specifically the ubiquitous Phalaenopsis or “Moth Orchid,” is often treated as a long-lived bouquet – admired while in flower and then relegated to a dark corner or, worse, the compost bin once the last petal falls.
However, April is a transformative month for these exotic epiphytes. As the spring equinox passes and the northern hemisphere experiences a surge in day length and ambient humidity, your orchid is primed for a physiological “reboot.”
If your orchid has recently finished its winter display, do not assume its season is over. With the right environmental triggers applied this month, you can coax your plant into a magnificent second bloom cycle.
Here is the definitive guide to spring orchid care in April and the six essential tricks to encourage a “re-spike.”
The April Biological Shift: Why Now?
In their native tropical environments, orchids do not follow a rigid four-season calendar. Instead, they respond to subtle shifts in light intensity and temperature gradients.
April represents the “sweet spot” in home cultivation. The harsh, dry heat of indoor winter radiators is being phased out, and the sun is moving into a position that provides higher foot-candle measurements without the scorching heat of July.
By applying specific “stressors” and “supports” in April, you tap into the plant’s natural urge to reproduce (bloom) before it settles into the heavy vegetative growth of summer.
1. The “Node-Point” Pruning Strategy
The most common question after an orchid drops its flowers is: Where do I cut the stem? In April, the answer depends entirely on the health of the existing spike.
The Green Spike Trick
If the flower spike is still green and firm, do not cut it down to the base. Look for the “nodes” – the small, scale-like bumps along the stem.
Count up from the base and find the third node. Make a clean, diagonal cut about half an inch above this point.
Why it works: These nodes contain dormant meristematic tissue. By removing the spent top of the spike, you redirect the plant’s hormonal energy to the highest remaining node. In the favorable light of April, this node will often “break,” sending out a secondary branch of flower buds within weeks.
The Brown Spike Protocol
If the spike has turned brown and shriveled, the plant has finished with that specific structure. Cut it off entirely, about an inch from the base of the plant. This allows the orchid to focus on growing a brand-new spike from the base of the leaves.
2. Triggering the “Thermal Drop”
Orchids are highly sensitive to thermoperiodism – the fluctuation between day and night temperatures. In the wild, a drop in temperature signals that a change in season is coming, which triggers the reproductive cycle.
The April Trick:
For two to three weeks in April, move your orchid to a spot where the nighttime temperature drops to between 55°F and 65°F (13°C–18°C). An unheated sunroom or a spot near a slightly drafty window (provided it doesn’t drop below 50°F) is ideal.
The Science: This 10-to-15-degree difference between day and night is the primary “trigger” for Phalaenopsis to initiate a new flower spike.
Without this thermal cooling, the plant may stay in a perpetual vegetative state, growing leaves but never buds.
3. Optimizing “Filtered” Spring Light
April sunlight is significantly stronger than February sunlight. While orchids love light, their leaves are prone to “sunburn,” which appears as bleached or black, crispy patches.
The Light Trick:
Move your orchid to an East-facing window. This provides the gentle morning sun that stimulates photosynthesis without the intense heat of the afternoon. If you only have a South-facing window, use a sheer curtain to filter the light.
The Indicator: Check the leaf color.
-
Dark Green: The plant is “hungry” for more light.
-
Yellow-Green/Reddish Tints: It is getting too much light.
-
Bright Olive Green: This is the “Goldilocks” zone for bloom induction.
4. The “Bloom Booster” Feeding Regimen
During the winter, many growers stop fertilizing. In April, as growth accelerates, your orchid needs specific nutrients to build the complex proteins required for flowering.
The Feeding Trick:
Switch to a high-phosphorus “Bloom Booster” fertilizer (look for a N-P-K ratio where the middle number is the highest, such as 10-30-20).
The Golden Rule: “Weakly, Weekly.” Mix the fertilizer to one-quarter strength and apply it every time you water.
Once a month, flush the pot with plain distilled water to wash away any accumulated mineral salts that can burn the sensitive “velamen” (the silvery coating) on the roots.
5. Humidity and the “Air Root” Hydration
Orchids don’t just “drink” through their pots; they absorb moisture from the air. Indoor humidity in April can still be surprisingly low, which causes emerging flower buds to “blast” (shrivel and fall off before opening).
The Hydration Trick:
Create a Humidity Tray. Fill a shallow tray with pebbles and water, then place the orchid pot on top of the pebbles. Ensure the bottom of the pot is not touching the water, as this leads to root rot.
Additionally, use a spray bottle to mist only the aerial roots (the silver roots snaking out of the pot). Avoid misting the “crown” (the center where the leaves meet), as trapped water there can cause crown rot, which is fatal to the plant.
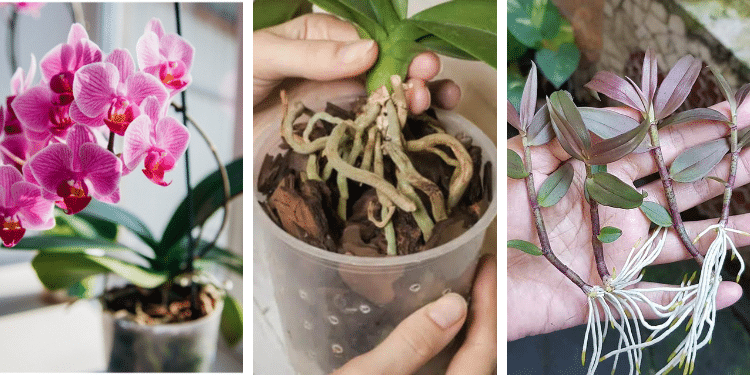
6. The “Root Check” and Potting Assessment
An orchid will rarely bloom if its roots are suffocating. April is the perfect time to assess the medium. If the bark looks like soil or smells musty, it has decomposed and is “choking” the roots.
The Stability Trick:
If the plant is wobbly in its pot, it lacks the structural security to support a heavy flower spike. Orchids like to be “snug.” If you must repot, choose a clear plastic pot with side slits.
This allows the roots to perform photosynthesis (yes, orchid roots photosynthesize!) and allows you to monitor their health.
Root Health Guide:
-
Silver/Grey: The plant is thirsty.
-
Vibrant Green: The plant is hydrated.
-
Brown/Mushy: Overwatered; roots are rotting.
3 Common Mistakes to Avoid in April
-
Ice Cube Watering: While popular, ice cubes can shock the tropical roots of an orchid. Use room-temperature water instead.
-
Over-potting: Never move an orchid into a significantly larger pot. They prefer to be slightly root-bound. A pot that is too large stays wet too long, leading to rot.
-
Moving the Plant While Budding: Once you see a new spike or buds forming, stop moving the plant. Changing its orientation to the light source can cause the buds to drop or the spike to grow in a twisted, unstable direction.
Orchid care is an exercise in observation. By applying these six tricks this April – pruning strategically, managing temperatures, and boosting nutrients – you are aligning your home environment with the natural rhythms of the tropics.