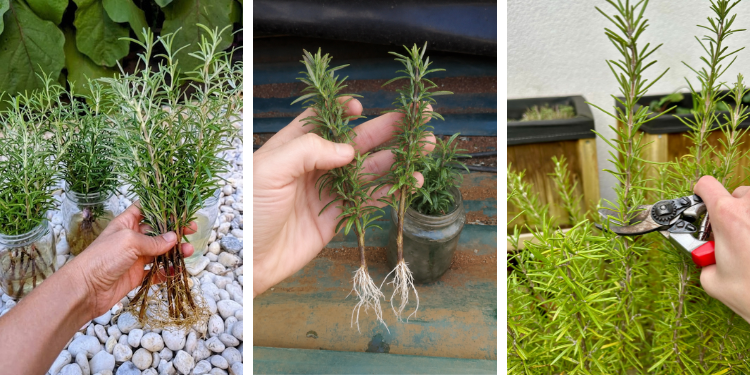
August is widely recognized by experienced herbalists and horticulturists as one of the best times of year to propagate fresh rosemary (Salvia rosmarinus).
By late summer, your established rosemary bushes have completed their spring flush of soft growth. Beneath those fragrant needle-like leaves lies an abundance of ideal propagation material: healthy, semi-ripe stems.
Taking semi-ripe rosemary cuttings in August allows you to multiply your favorite varieties – whether upright, weeping, or creeping – entirely for free.
With just a handful of summer cuttings, you can easily produce dozens of strong new plants to line garden borders, fill decorative patio containers, or gift to friends and neighbors next spring.
Why August Is the Golden Window for Rosemary Cuttings
Propagation success depends heavily on the physiological maturity of the stem wood you select:
-
Softwood Cuttings (Spring): Soft, tender spring shoots root quickly, but their high moisture content makes them prone to wilting, drooping, and fungal rot.
-
Hardwood Cuttings (Winter): Mature, thick woody stems from winter growth are tough and disease-resistant, but their cell division is slow, often taking months to push out new roots.
-
Semi-Ripe Cuttings (August): Late summer growth strikes the ultimate balance. The base of an August shoot has matured, turning firm and light brown (providing structural strength against rot), while the upper tip remains pliable, green, and active with natural growth hormones.
In August, warm soil and ambient temperatures stimulate cell division at the cut nodes. Meanwhile, the shortening day length signals the plant to divert its energy away from flowering and top growth toward building a strong root system before winter arrives.
Essential Materials and Preparation
Gathering clean, high-quality supplies before taking your cuttings keeps the process smooth and prevents airborne fungal spores from contaminating fresh plant wounds.
Recommended Supplies:
-
Sharp Pruning Shears or Razor: Clean your blades with rubbing alcohol or a mild bleach solution to prevent transferring plant pathogens.
-
Free-Draining Rooting Substrate: Never use heavy garden soil or standard moisture-retentive potting mix alone. Mix 50% peat-free potting compost with 50% coarse horticultural sand, perlite, or grit.
-
Containers: Small 3-inch or 4-inch deep pots, cell trays, or terracotta pots with bottom drainage holes.
-
Rooting Hormone (Optional): Organic hormone powder, liquid willow water, or a light dip in raw honey can encourage faster root initiation, though healthy August rosemary cuttings often root well on their own.
-
Humidity Cover: A clear plastic bag, plastic dome, or clear cut-bottom soda bottle to maintain ambient moisture.
6 Steps to Propagate Rosemary in August
Follow this step-by-step process to transform late summer stems into sturdy, independent young plants:
Water vs. Soil Propagation Comparison
While rosemary can be rooted in either plain water or a gritty potting substrate, understanding the trade-offs helps you choose the best method for your setup:
| Propagation Method | Gritty Soil Substrate (Recommended) | Water Rooting |
| Root Quality | Develops thick, sturdy soil-adapted roots | Produces fragile, brittle water roots |
| Transplant Shock | Low (roots adapt immediately to potting mix) | Moderate to High (roots must adapt to soil later) |
| Rot Risk | Low (gritty mix provides aeration and drainage) | Moderate (water must be changed every 2–3 days) |
| Rooting Time | 4 to 6 weeks | 3 to 5 weeks |
| Success Rate | High 85-95% | Moderate 60-70% |
Care After Rooting: Overwintering Your Free Rosemary Plants
By late September or early October (roughly 4 to 6 weeks after taking your August cuttings), your rosemary will begin developing a delicate network of fresh white roots.
How to Confirm Rooting:
-
You will notice fresh, tiny lime-green leaf shoots sprouting at the top tips.
-
A very gentle upward tug on the stem meets soft resistance from anchored roots.
Overwintering Steps:
Once rooted, remove the plastic humidity cover completely. Keep the young plants in their pots through late autumn.
As winter approaches, protect your young rosemary from hard freezes by moving the pots into an unheated greenhouse, cold frame, or sheltered porch corner.
Because rosemary is a drought-tolerant Mediterranean native, water very sparingly during winter dormancy – only enough to keep the gritty mix from turning completely bone-dry.
In early spring, as temperatures rise, pot each rooted cutting individually into small pots filled with gritty potting mix.
By late spring or early summer, your free rosemary plants will be robust, well-established, and ready for planting out into your permanent garden beds!
Common Mistakes to Avoid
-
Overwatering: Excess water is the leading killer of rosemary cuttings. Always let the top layer of substrate dry slightly between light waterings to allow oxygen to reach developing roots.
-
Using Soft Spring Growth or Old Wood: Very soft tips wilt before rooting, while thick, dark brown wood roots extremely slowly. Stick strictly to semi-ripe stems with green tips and firm, light-brown bases.
-
Direct Baking Sunlight: Placing covered cuttings under blazing direct sun creates a mini-greenhouse effect that bakes the tender shoots. Always choose bright, indirect shade.
Propagating rosemary in August is a practical, cost-effective skill that every gardener can master.
By taking advantage of late summer’s semi-ripe stem growth, you can turn a single healthy shrub into dozens of free fragrant plants for years to come.
The best gardens don’t just brighten your yard – they become something you can enjoy season after season.
If you’re ready to grow your own backyard pharmacy, the Medicinal Garden Kit is a wonderful place to begin.
Inside you’ll find 2,409 non-GMO seeds, a detailed Herbal Medicinal Guide, and 2 FREE bonuses to help you grow a wide variety of traditional medicinal herbs with confidence.
Take a look at the Medicinal Garden Kit and start growing something truly rewarding.