Pineapple (Ananas comosus) is one of the most popular tropical fruits in the world, prized for its vibrant sweetness and refreshing flavor.
Yet, every time you slice open a fresh pineapple, you likely toss the leafy green crown directly into the compost or trash bin.
What many home gardeners do not realize is that the spiky crown sitting on top of the fruit is a living, resilient vegetative propagation unit.
With a simple twist of your wrist, a bit of prep, and basic care on a sunny window sill, that discarded crown can transform into a striking tropical houseplant – and eventually yield a brand-new, homegrown pineapple.
The Botanical Science of Bromeliad Propagation
Pineapples belong to the family Bromeliaceae, a diverse group of plants native to the tropical Americas.
Understanding how pineapples grow helps explain why regenerating a fruit from its leaf top is surprisingly reliable:
-
Epiphytic and Terrestrial Adaptations: Bromeliads are evolutionary masters of water retention. The leaves of a pineapple crown form a tight, central rosette that channels rainwater down to the base of the plant.
-
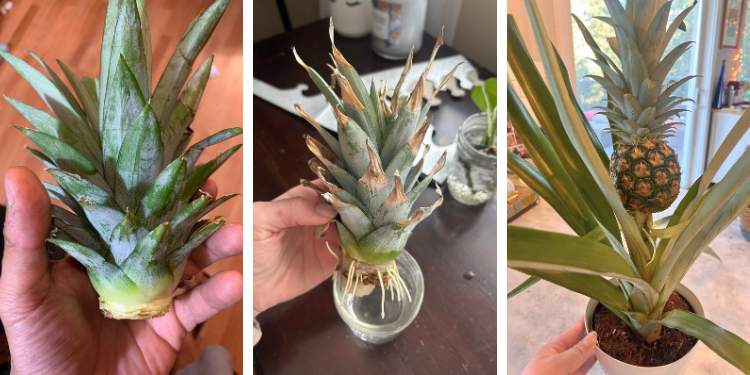
Adventitious Root Primordia: If you peel back the bottom leaves of a fresh pineapple crown, you will notice tiny, brown, bump-like structures encircling the core stem. These are adventitious root primordia – dormant root buds waiting for moisture, warmth, and oxygen to begin active growth.
-
CAM Photosynthesis: Pineapples utilize Crassulacean Acid Metabolism (CAM). Unlike typical plants that open their stomata (breathing pores) during the hot day, pineapples keep them tightly shut to prevent water loss, opening them at night to absorb carbon dioxide. This makes them extraordinarily drought-tolerant and easy to grow indoors.
Step 1: Choosing and Preparing the Pineapple Crown
Success starts at the grocery store or fruit market. A damaged or overripe crown will rot before it ever strikes roots.
Selecting the Right Fruit
Look for a pineapple with firm, dark green leaves in the center of the crown. Avoid fruit with dry, brown, or mushy leaves, or pineapples that are excessively soft and overripe at the base, as fungal decay may have already traveled up into the crown core.
Extracting the Crown
-
The Twist Method (Recommended): Firmly grasp the body of the pineapple in one hand and the base of the green leafy crown in the other. Twist the crown firmly while pulling upward. The core stem will pop out cleanly from the fruit without leaving excess sugary flesh behind.
-
The Knife Method: If the crown resists twisting, slice off the top of the pineapple 1/2 inch below the leaf base. Carefully trim away all soft yellow fruit flesh around the central core stem. Leaving sweet fruit flesh attached invites fruit flies, mold, and bacterial rot.
Step 2: Stripping Leaves and Callousing
This is the critical step that most beginner growers skip, leading to mushy, rotted stems:
Step 3: Rooting Your Pineapple (Water vs. Soil)
Once calloused, you can root your pineapple using either a water jar or direct potting soil.
Method A: Water Rooting (Best for Visual Progress)
-
Fill a clear glass jar with room-temperature tap water.
-
Suspend the crown over the jar using toothpicks inserted into the thick base, ensuring only the bare stem core sits submerged in water while the green leaves remain above the water line.
-
Place in bright, indirect sunlight and change the water every 2 to 3 days.
-
White, healthy roots will sprout within 2 to 3 weeks. Transplant into soil once roots reach 1 to 2 inches in length.
Method B: Direct Soil Rooting (Stronger Root Structure)
-
Fill a 6-inch clay or terracotta pot with a light, gritty potting mix (such as 50% succulent/cactus mix and 50% perlite).
-
Moisten the soil lightly and press the calloused stem core 1 inch deep into the medium. Press the soil firmly around the base to hold the crown upright.
-
Place in a warm spot with bright light. Soil-rooted crowns skip the transplant shock of water-grown roots.
Pineapple Propagation Method Comparison
| Feature / Metric | Water Rooting Method | Direct Soil Rooting Method |
| Setup Complexity | Very Low (Glass jar & water) | Low (Pot & gritty soil) |
| Rooting Timeframe | 2 to 3 weeks | 3 to 4 weeks |
| Root Quality | Thin, water-adapted roots | Strong, soil-anchored roots |
| Rot Risk | Moderate (if water isn’t changed) | Low (if soil isn’t overwatered) |
| Transplant Shock | Moderate (switching to soil) | None |
Long-Term Care: Growing Your Pineapple to Fruit
Pineapples are slow-growing perennial plants. With proper environmental care, your potted crown will develop into an impressive tropical feature plant and eventually bloom.
1. Sunlight and Temperature Requirements
Pineapples require 6 to 8 hours of direct, bright sunlight daily. An east- or south-facing window is ideal for indoor growing.
Because they are tropical plants, pineapples cannot tolerate frost; keep temperatures above 60°F (15°C) year-round.
2. Watering and Feeding Schedule
-
Watering: Allow the top 2 inches of soil to dry out completely between waterings. Pour water directly onto the soil and lightly into the central leaf cup.
-
Fertilizing: Feed monthly during spring and summer using a balanced, liquid organic houseplant fertilizer diluted to half-strength.
3. Container Upgrades
After 6 to 12 months, your pineapple will outgrow its starter pot. Transplant it into a large 5- to 7-gallon container with drainage holes to accommodate its mature root structure.
How to Induce Flowering (The Apple Method)
Under indoor conditions, a grown pineapple plant usually flowers naturally when it reaches 2 to 3 years of age.
However, if your mature plant has at least 30 large leaves and refuses to bloom, you can induce flowering using natural ethylene gas:
Fun Harvest Fact: Homegrown pineapples are harvested when the base turns golden-yellow and emits a sweet, tropical fragrance. Because home-grown fruit ripens completely on the plant, it is often significantly sweeter and less acidic than store-bought fruit picked prematurely for shipping!
Turning a kitchen waste item into a flourishing, fruit-bearing houseplant is one of the most rewarding propagation projects you can try at home.