Sweet potatoes are a nutritious and versatile crop that can be grown almost anywhere, even if you don’t have a traditional garden.
Growing sweet potatoes in sacks and bags is an excellent way to maximize space, reduce soil issues, and ensure a bountiful harvest.
If you’re ready to try your hand at this simple and efficient gardening method, here’s a comprehensive guide to help you grow sweet potatoes in sacks and bags for the best possible harvest.
Why Grow Sweet Potatoes in Sacks and Bags?
Using sacks and bags to grow sweet potatoes offers numerous benefits:
- Space Efficiency: Ideal for small gardens, patios, or balconies.
- Improved Soil Management: Allows you to control the soil quality and drainage, which is crucial for healthy sweet potato growth.
- Mobility: Bags can be moved to optimize sunlight exposure.
- Pest and Disease Control: Reduces the risk of soil-borne pests and diseases compared to traditional in-ground planting.
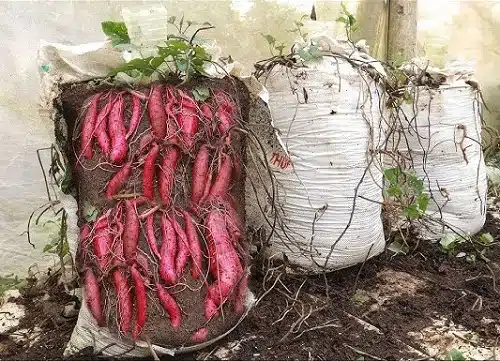
- Ease of Harvesting: Simply dump the bag to retrieve the sweet potatoes, minimizing damage to the crop.
What You’ll Need to Get Started
- Sacks or Bags: Use durable, breathable materials like grow bags, burlap sacks, or even sturdy reusable shopping bags. A capacity of 10-20 gallons is ideal.
- Quality Soil Mix: Sweet potatoes thrive in loose, well-draining soil. Use a mix of garden soil, compost, and sand in equal parts.
- Sweet Potato Slips: Purchase or propagate sweet potato slips (young shoots grown from mature sweet potatoes).
- Fertilizer: A balanced, slow-release fertilizer with a focus on potassium and phosphorus.
- Watering Can: To ensure consistent moisture levels.
Step-by-Step Guide to Growing Sweet Potatoes in Sacks and Bags
1. Choose the Right Bag or Sack
- Opt for breathable materials like fabric grow bags or burlap sacks. These allow excess water to drain and provide good aeration for the roots.
- Make sure the bag has adequate drainage holes at the bottom.
2. Prepare the Soil
- Sweet potatoes need loose, sandy soil to allow their roots to expand freely.
- Mix together:
- 1 part garden soil
- 1 part compost
- 1 part sand or perlite
- Fill the bag about halfway with the prepared soil mix.
3. Prepare the Sweet Potato Slips
- If you’re propagating your own slips, start by submerging a mature sweet potato in water, leaving half above the surface. Place it in a warm, sunny spot.
- In 2-3 weeks, sprouts will form. Once they are 4-6 inches long, twist them off and place the slips in water to develop roots.
4. Plant the Slips
- Once your slips have a good root system, plant them in the soil-filled bag.
- Space the slips about 12 inches apart, depending on the size of your bag.
- Bury the slips up to their first set of leaves, ensuring the roots are well-covered with soil.
5. Provide Optimal Growing Conditions
- Sunlight: Place the bags in a sunny spot where they receive at least 6-8 hours of direct sunlight daily.
- Temperature: Sweet potatoes thrive in warm temperatures between 70-85°F (21-29°C).
6. Water Regularly
- Sweet potatoes need consistent moisture, but overwatering can lead to rot.
- Water deeply whenever the top 1-2 inches of soil feel dry to the touch.
- Avoid letting the soil become waterlogged by ensuring proper drainage.
7. Fertilize Appropriately
- Use a balanced fertilizer once a month during the growing season.
- Avoid high-nitrogen fertilizers, as they promote leafy growth at the expense of tubers.
- Potassium and phosphorus-rich fertilizers help develop large, healthy tubers.
8. Add More Soil as the Plants Grow
- As the sweet potato vines grow, add more soil to the bag, similar to the hilling process for potatoes.
- This encourages additional root growth and maximizes your harvest.
Managing Sweet Potato Growth
1. Pruning
- Allow the vines to sprawl naturally but trim them back if they become too long or unruly.
- Pruning can help direct energy toward root and tuber development.
2. Pest Control
- Keep an eye out for pests like aphids, whiteflies, and beetles.
- Use natural solutions like neem oil or insecticidal soap to manage infestations.
3. Monitor for Disease
- Growing sweet potatoes in bags reduces the risk of soil-borne diseases, but still watch for signs of fungal issues like root rot or leaf spots.
Harvesting Your Sweet Potatoes
1. Know When to Harvest
- Sweet potatoes are typically ready to harvest 90-120 days after planting, depending on the variety.
- Look for yellowing leaves and reduced vine growth as signs they’re ready to harvest.
2. How to Harvest
- Stop watering 1-2 weeks before harvesting to allow the soil to dry out.
- Simply tip over the bag and gently sift through the soil to retrieve the tubers.
- Be careful not to damage the sweet potatoes during harvest.
3. Cure the Sweet Potatoes
- After harvesting, cure the sweet potatoes by placing them in a warm, humid environment (85°F and 85% humidity) for 7-10 days.
- This process helps sweeten the flavor and extends their shelf life.
Tips for Maximizing Your Harvest
- Choose the Right Variety: Some sweet potato varieties, like “Beauregard” or “Georgia Jet,” are particularly suited for container growing.
- Use Larger Bags: Bigger bags provide more room for root expansion, leading to larger harvests.
- Rotate Locations: Move the bags to different spots each season to prevent soil depletion and reduce the risk of pests.
- Mulch the Topsoil: Mulching helps retain moisture and regulate soil temperature, especially in hot climates.
Common Mistakes to Avoid
- Overwatering: Too much water can cause root rot. Always ensure proper drainage.
- Poor Soil Quality: Compact or nutrient-deficient soil will hinder tuber growth.
- Not Adding Soil: Failing to add more soil as the plant grows can limit tuber production.
- Harvesting Too Early: Allow the tubers to mature fully for the best flavor and size.
Growing sweet potatoes in sacks and bags is a fun, space-saving way to cultivate this delicious and nutritious crop. By following these steps and tips, you can enjoy a generous harvest even in small spaces.


