Gardening is not only a therapeutic activity but also a fantastic way to have fresh herbs and spices right at your fingertips.
Whether you have a small balcony, a sunny windowsill, or just a tiny space in your kitchen, you can easily grow your favorite herbs using a unique potted garden technique.
This method involves using a simple plastic cup to create a self-watering and self-fertilizing system that will keep your plants healthy and thriving.
Here’s a step-by-step guide to mastering this technique and growing your own beautiful, bountiful potted garden!
What You’ll Need
- A plastic cup (medium size)
- A pot of your choice
- Substrate or vegetable soil
- Herb cuttings or seeds (rosemary, mint, basil, etc.)
- Garlic clove
- Banana peel
- Water
Step-by-Step Guide to Setting Up Your Potted Garden
Step 1: Prepare the Plastic Cup
- Make Holes for Drainage: Start by taking a plastic cup and poking several small holes at the bottom and around the sides. These holes will help with drainage, ensuring that your herbs receive the right amount of water without becoming waterlogged.
- Place the Cup in the Pot: Position the prepared cup in the center of your chosen pot or vase. Make sure that the rim of the cup is slightly above the soil level to make watering easier.
Step 2: Fill the Pot with Soil
- Add Substrate Around the Cup: Begin filling the pot with your chosen substrate or vegetable soil, carefully placing it around the cup. Do not fill the cup itself with soil; leave it empty for now.
- Leave Space at the Top: Make sure the cup is not completely covered with soil; keep a small portion of the cup above the soil level. This will allow easy access for watering and adding fertilizers.
Step 3: Plant Your Herbs
- Choose Your Herbs: Select the herbs you want to grow, such as rosemary, mint, basil, or any other seasoning of your choice. You can use fresh herb cuttings or seeds, depending on your preference.
- Plant the Cuttings or Seeds: Place your herb cuttings or seeds in the soil around the plastic cup. Ensure they are spaced evenly to allow for proper growth and air circulation.
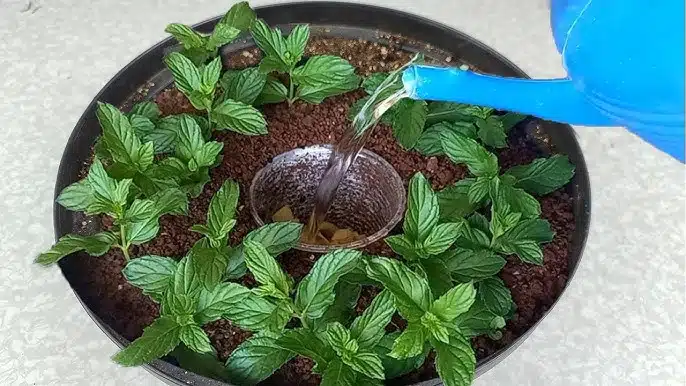
Step 4: Watering the Herbs
- Water Inside the Cup: Instead of watering the entire pot, pour water directly into the plastic cup. The holes in the cup will allow the water to seep out gradually, keeping the surrounding soil moist without overwatering.
- Maintain Moisture: Check the cup regularly and refill it as needed. This method ensures that your herbs receive a consistent supply of water, promoting healthy growth.
Step 5: Add Natural Fertilizers
- Garlic for Rooting and Growth: Chop a clove of garlic into small pieces and place it inside the plastic cup. Garlic is rich in nutrients that help promote rooting and growth of herb cuttings.
- Banana Peel for Nutrients: Cut a banana peel into small pieces and add it to the cup. Banana peels are packed with potassium, nitrogen, phosphorus, and other essential nutrients that support plant growth.
- Fill the Cup with Water: After adding the garlic and banana peel, fill the cup with water. This will allow the nutrients to slowly dissolve and seep into the soil, providing a steady supply of natural fertilizer to your herbs.
How This Technique Works
1. Self-Watering System
By filling the plastic cup with water, you create a self-watering system that releases water gradually through the holes. This ensures that the soil stays consistently moist without becoming waterlogged, preventing root rot and promoting healthier plant growth.
2. Slow-Release Fertilizer
The garlic and banana peels in the cup act as natural fertilizers, breaking down slowly and releasing essential nutrients into the soil over time. This method provides a continuous source of nourishment for your herbs, enhancing their growth and flavor.
Additional Tips for Success
- Choose the Right Herbs: This technique works well with a variety of herbs such as rosemary, mint, basil, and rue. You can experiment with different combinations to find what works best for you.
- Monitor Soil Moisture: While the plastic cup helps regulate water flow, it’s still important to check the soil periodically to ensure it stays moist, but not too wet.
- Rotate Your Plants: Ensure your pot receives enough sunlight by rotating it regularly. Most herbs need at least 6-8 hours of sunlight per day for optimal growth.
- Refresh Fertilizers: Regularly add new pieces of banana peel and garlic to the cup to maintain a steady supply of nutrients. This will keep your herbs strong and healthy over time.
Why Every Woman Should Try This Potted Garden Technique
- Saves Time and Effort: This self-watering, self-fertilizing system reduces the need for constant watering and fertilizing, making it perfect for busy schedules.
- Eco-Friendly and Cost-Effective: Reuse kitchen scraps like banana peels and garlic to nourish your plants, reducing waste and saving money on commercial fertilizers.
- Perfect for Small Spaces: Ideal for apartments, balconies, or any small space, this method allows you to grow fresh herbs even if you don’t have a traditional garden.
- Healthy, Homegrown Herbs: Enjoy the benefits of fresh, organic herbs right at your fingertips, adding flavor and nutrition to your meals.
This clever potted garden technique using a plastic cup for watering and natural kitchen scraps for fertilizing offers an easy, efficient, and sustainable way to grow your own herbs at home.
By ensuring your plants receive just the right amount of water and nutrients, you can enjoy a thriving garden with minimal effort.


