
Maintaining a vegetable garden requires consistent watering, especially during dry spells or when you’re away.
Instead of investing in expensive irrigation systems, you can create an automatic vegetable waterer using a plastic bottle.
This simple DIY solution provides a slow and steady water supply, keeping your plants hydrated while saving water.
In this guide, we’ll walk you through step-by-step instructions on how to make a self-watering system using a plastic bottle.
Why Use an Automatic Vegetable Waterer?
Before we get into the process, let’s look at the benefits of using a plastic bottle vegetable waterer:
- Water Conservation: Delivers water slowly, preventing waste and ensuring optimal hydration.
- Cost-Effective: Uses recycled materials, making it a zero-cost irrigation method.
- Reduces Plant Stress: Provides consistent moisture, preventing overwatering or underwatering.
- Perfect for Busy Gardeners: Reduces the need for daily watering, great for vacations or busy schedules.
- Eco-Friendly: Repurposing plastic bottles helps reduce waste and environmental impact.
Materials Needed
To build your own DIY automatic vegetable waterer, gather the following materials:
- A plastic bottle (1L or 2L preferred)
- A sharp knife or scissors
- A drill or a needle (for making small holes)
- String or wire (optional for hanging method)
- Soil or mulch (to help cover the bottle for slow water release)
Step-by-Step Guide to Making an Automatic Vegetable Waterer
Step 1: Choose the Right Bottle
Select a sturdy plastic bottle based on the size of your plant and how long you need it to last:
- 1-liter bottles work well for small plants.
- 2-liter bottles provide water for larger plants or longer periods.
Step 2: Prepare the Bottle
- Clean the Bottle: Rinse the bottle thoroughly to remove any residues.
- Remove the Label: Peel off any labels to allow clear visibility of the water level.
Step 3: Make Drainage Holes
Using a needle, drill, or knife, create small holes in the bottle to control the water flow.
Methods for Hole Placement:
1.Bottom Hole Method (for deep watering):
- Poke 2-3 small holes at the bottom of the bottle.
- This allows water to gradually seep into the soil.
2. Side Hole Method (for controlled release):
- Poke small holes on the lower half of the bottle.
- This helps distribute water evenly around plant roots.
3. Cap Hole Method (for slow drip system):
- Drill 1-2 small holes in the bottle cap.
- The tighter the cap, the slower the drip rate.
Step 4: Fill the Bottle with Water
- Fill the bottle with clean water.
- If desired, mix in liquid fertilizer to provide additional nutrients to plants.
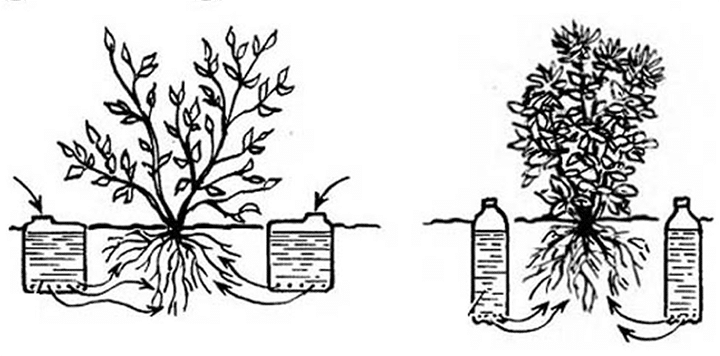
Step 5: Insert the Bottle into the Soil
- Bury the bottle near the plant, keeping the holes facing the roots.
- Leave at least one-third of the bottle above the soil for easy refilling.
- Optionally, cover the exposed part with mulch to retain moisture.
Step 6: Monitor Watering Efficiency
- Check the water level every few days.
- If the water drains too quickly, make smaller holes.
- If it’s too slow, enlarge the holes slightly.

Alternative Methods for Hanging or Suspended Watering
For plants in hanging baskets, raised beds, or vertical gardens, you can modify the method:
- Hanging Water Drip: Suspend the bottle above the plant and let water drip slowly through a hole in the cap.
- Tube Attachment: Use a small hose to direct water flow to specific areas.
Additional Tips for Success
- Use Multiple Bottles for Large Gardens: Place bottles near each plant to ensure even distribution.
- Adjust the Hole Size: Fine-tune hole sizes based on soil type (sandy soil drains faster, clay soil holds more water).
- Monitor Soil Moisture: Check the soil regularly to prevent overwatering.
- Protect from Algae Growth: If placed in direct sunlight, paint the bottle or wrap it in a cloth to block light.
Benefits of a Plastic Bottle Automatic Waterer for Vegetable Gardens
1. Healthier Plants
Maintains consistent moisture levels, preventing wilting and root damage.
2. Reduced Water Usage
Prevents excess evaporation and runoff, maximizing water efficiency.
3. Time-Saving
No need for daily watering, perfect for vacations or busy schedules.
4. Easy to Maintain
Simple to refill and adjust based on plant needs.
5. Eco-Friendly Gardening
Reduces plastic waste while promoting sustainable gardening practices.
Frequently Asked Questions (FAQs)
1. How long does the water last in the bottle?
Depending on the size of the holes and the type of soil, a 2-liter bottle can last 5-7 days.
2. Can I use this method for indoor plants?
Yes! Just make smaller holes and monitor the soil moisture to avoid overwatering.
3. What happens if my bottle empties too quickly?
Check the hole size—smaller holes will slow the water flow.
4. Can I add nutrients to the water?
Absolutely! Adding liquid fertilizer will provide nutrients while watering.
5. Will the bottle attract mosquitoes?
If mosquitoes are a concern, cover the top opening with a fine mesh or use a cap with small holes.
Creating an automatic vegetable waterer using a plastic bottle is an easy, cost-effective way to ensure your plants receive consistent moisture.
This DIY irrigation system is perfect for small and large gardens, reduces water waste, and is an eco-friendly gardening solution.
By following this guide, you can enjoy healthier plants, a greener garden, and a stress-free watering routine. Try it out today and experience the benefits of self-watering plants firsthand!


